
1. Introduction to Needle Threaders
Threading a needle—tiny eye, slippery thread, shaky hands—if you’ve ever found yourself squinting and muttering under your breath, you’re not alone. For machine embroidery enthusiasts, this seemingly simple step can be the most frustrating part of an otherwise creative process. Enter the needle threader: a small but mighty tool that transforms threading from a tedious chore into a quick, almost magical, flick of the wrist.
In this guide, we’ll take you from threading struggles to threading mastery. You’ll discover clear, step-by-step instructions, explore the different types of needle threaders (from classic wire loops to sturdy hooks and machine-integrated wonders), and learn how to choose and use the best tool for your embroidery needs. Along the way, we’ll cover visual cues, safety tips, troubleshooting, and how to seamlessly integrate threaders into your embroidery workflow. Ready to banish threading woes for good? Let’s dive in.
Table of Contents
- 1. Introduction to Needle Threaders
- 2. Step-by-Step Guide to Using Needle Threaders
- 3. Types of Needle Threaders and Their Best Uses
- 4. Visual Learning Resources
- 5. Safety Protocols and Problem Prevention
- 6. Troubleshooting Common Threader Issues
- 7. Machine-Specific Optimization Techniques
- 8. Integrating Threaders into Embroidery Workflows
- 9. Conclusion
- 10. FAQ: Needle Threader Essentials
2. Step-by-Step Guide to Using Needle Threaders
2.1 Preparation and Compatibility Checks
Before you reach for your needle threader, a little prep work goes a long way toward a smooth experience. Start by verifying that your needle and threader are compatible. Most home sewing machine needle threaders are designed for standard needle sizes, specifically 75/11 to 100/16. If you’re using transparent nylon monofilament thread, stick to needles in the 90/14 to 100/16 range. Decorative threads, twin needles, and wing needles? These are best threaded by hand, as most threaders aren’t built for their unique shapes or thickness.
Next, prepare your thread. Cut it to the length you’ll need—twice as long as you think you’ll use is a good rule of thumb, but avoid excess that could tangle. Thread that’s too long increases the odds of knots and frustration. Make sure your needle is clean and free of burrs, and always power off your machine before threading for safety.
A quick compatibility checklist:
- Needle Size: 75/11–100/16 for most threaders
- Thread Type: Standard cotton or polyester; avoid metallic, decorative, or specialty threads unless your threader specifically supports them
- Needle Type: Standard single needles; avoid twin or wing needles
Taking these steps ensures your needle threader will glide smoothly through the eye, saving you time and preventing breakage.
2.2 Wire Loop Method
The wire loop threader is the classic, go-to tool for most embroiderers. Its magic lies in simplicity—a thin wire loop attached to a handle that acts as a “thread ferry,” making the journey through the needle’s eye effortless.
Step-by-step:
- Insert the Wire Loop: Hold your needle in one hand and gently push the wire loop of the threader through the eye of the needle. The wire should pass completely through, with the handle on one side and the loop on the other.
- Thread the Loop: Take your cut thread and insert it through the wire loop. Pull it about a quarter to halfway through, enough so you have a good grip.
- Pull Through: Holding the needle and threader steady, gently pull the wire loop back out of the needle’s eye, bringing the thread with it. The thread should now be neatly threaded through the needle.
- Finish Up: Remove the thread from the loop and adjust the length as needed. Tie a knot if you’re working with doubled thread, and you’re ready to start stitching.
Pro tips from video tutorials and expert guides:
- Hold both the needle and threader firmly to avoid bending the delicate wire.
- If your threader has a handle, use it for extra control.
- Practice the motion a few times without thread to get a feel for the process.
This method is especially helpful for machine embroidery for beginners, providing a reliable starting point for fine needles or when your eyesight or dexterity needs a little backup. Just remember, the wire loop is delicate—gentle hands win the day.
2.3 Hook-Style & Alternative Techniques
Not all threaders are created equal. Hook-style threaders offer a sturdier, more rigid alternative to the classic wire loop, making them ideal for thicker threads or multi-strand embroidery floss.
How to use a hook-style threader:
- Insert the Hook: Guide the rigid hook through the eye of the needle.
- Catch the Thread: Place your thread over the hook, holding it with light tension.
- Pull Through: Gently pull the hook back through the needle’s eye, bringing the thread with it.
- Release: Remove the thread from the hook, and you’re ready to sew.
Pros:
- More durable than wire loops, less prone to bending or breaking.
- Excellent for embroidery floss, metallic threads, or multi-strand work.
- Easier for users with dexterity challenges.
Cons:
- Slightly bulkier than wire loop threaders.
- May not fit through ultra-fine needle eyes.
Alternative approaches: Some threaders and machines use a “needle-first” technique, where you place the needle onto the threader, then lay the thread in a slot or groove before pulling everything through together. This method is common in certain hand embroidery threaders and some machine-integrated designs.
Expert tip: Practice makes perfect. Try threading a few times without thread to get the feel for how much pressure to use—too much force can bend even the sturdiest hook.
When choosing between wire loop and hook-style threaders, consider your thread type, needle size, and personal comfort. For most standard embroidery projects, either method will serve you well, but if you work with specialty threads or have a heavy stitching schedule, a hook-style threader may quickly become your new best friend.
3. Types of Needle Threaders and Their Best Uses
3.1 Manual vs. Machine-Integrated Threaders
Needle threaders come in a surprising variety of shapes and functions, each tailored for different embroidery needs. Here’s how the main types stack up:
Wire Loop Threaders:
- Description: A fine wire loop attached to a small handle or tab.
- Best For: Standard needle sizes and basic threads.
- Pros: Compact, affordable, easy to use.
- Cons: Delicate wire can bend or break with frequent use, especially with metallic threads.
Flat Hook/Rigid Hook Threaders:
- Description: A sturdy, rigid hook that slides through the needle eye.
- Best For: Thicker threads, multi-strand floss, and users with dexterity challenges.
- Pros: Durable, stands up to repeated use, excellent for embroidery work.
- Cons: Slightly bulkier, may not fit ultra-fine needles.
Manual Machine Needle Threaders:
- Description: Built-in mechanisms on sewing and embroidery machines that help guide the thread through the needle.
- Best For: Frequent machine embroidery, users who want hands-free convenience.
- Pros: Integrated into the machine, consistent performance when maintained.
- Cons: Requires proper alignment, may not work with all needle types, can become misaligned or damaged.
Automatic/Electronic Threaders:
- Description: Advanced systems on high-end machines that automate threading with mechanical arms or sensors.
- Best For: High-volume embroidery on multi needle embroidery machines, users seeking maximum convenience.
- Pros: Fast, reduces eye strain, minimal user intervention.
- Cons: Can be finicky—many users report inconsistent results, and they may not work with specialty needles or threads.
Durability Note: Wire loop threaders are prone to breakage if used with thick or metallic threads, while rigid hook threaders last longer and are more robust for heavy-duty use. Machine-integrated threaders, when properly maintained, offer consistency but can require occasional realignment.
3.2 Matching Threaders to Embroidery Scenarios
Choosing the right needle threader isn’t just about preference—it’s about matching the tool to your specific embroidery scenario:
| Thread Type / Fabric | Recommended Threader | Reason |
|---|---|---|
| Standard cotton/polyester | Wire loop or hook | Works reliably with all standard threaders |
| Metallic threads | Sturdy wire loops or flat hooks | Delicate wire threaders may bend |
| Multi-strand embroidery floss | Rigid hook threaders | Handles multiple strands with ease |
| Fine silk threads | Micro threaders | Designed for ultra-fine work |
- General Hand or Machine Embroidery: A wire loop threader (like Dritz Looped) is a solid all-around choice.
- Varied Needle Sizes: Double-ended threaders (like Clover Double) offer flexibility for different projects.
- Dexterity Challenges: Sturdy, ergonomic designs (like Bohin Easy) make threading easier and more comfortable.
- Fine Embroidery: Micro threaders (such as Puffin Micro) are specifically designed for small needle eyes and delicate threads.
- Machine Embroidery: Manual or automatic machine threaders are convenient, but manual threaders remain the reliable backup—especially for specialty threads or when the machine’s auto-threader struggles.
Pro tip: Keep a small collection of threaders on hand. No single tool fits every scenario, but with a wire loop, a rigid hook, and a micro threader in your kit, you’ll be ready for anything your embroidery journey throws your way.
4. Visual Learning Resources
In the world of machine embroidery, seeing is believing—and learning. Threading a needle is a tiny, precise task, and even the best written instructions can leave you squinting and second-guessing. That’s why visual learning resources—videos, extreme close-up photos, and step-by-step guides—have become the gold standard for mastering needle threaders. Let’s explore what makes these visual tools so effective and how they can elevate your embroidery experience.
4.1 Critical Video Demonstration Techniques
Ever tried threading a needle with just a written manual? It’s like assembling a jigsaw puzzle in the dark. The most successful visual tutorials shine a spotlight—literally—on every micro-movement, making the invisible visible.
Extreme Close-Ups Are Essential: Top YouTube creators and sewing educators agree: you need to see the action up close. As one instructor from Not Your Mama's Quilt Store puts it, “Pull out a magnifying glass and follow along so you can thread like the pros.” The eye of the needle and the tiny hook of a threader are nearly microscopic, so high-resolution, zoomed-in shots are a must. Successful videos often use macro lenses to show the wire or hook sliding through the needle’s eye, making every detail crystal clear.
Step-by-Step Breakdown: The best tutorials break the process into digestible steps, each shown in real time. For instance, in the “How to Use a Needle Threader - Two Types!” video, the creator marks clear timestamps for each threader style, demonstrating the insertion of the wire loop, the threading motion, and the gentle pull-through. This allows viewers to pause, rewind, and practice each action at their own pace.
Real-Time Troubleshooting: Mistakes happen—even on camera. Effective visual guides don’t edit out the hiccups. Instead, they show what can go wrong (like missing the needle’s eye or the wire bending) and how to fix it on the spot. This “learn by watching” approach reassures beginners that errors are normal and solvable.
Comparative Demonstrations: Many creators show multiple threader types side by side, highlighting pros and cons. For example, one video compares the classic wire loop with the sturdier hook style, demonstrating which works best for embroidery floss or metallic threads. This helps viewers choose the right tool for their specific needs.
Physical Scale References: Because everything is so small, instructors often use larger needles for demonstration or place objects next to a ruler or hand for scale. This helps viewers understand the proportions and apply the technique to their own tools.
Short-Form and Embedded Visuals: With the rise of TikTok and YouTube Shorts, bite-sized tutorials now offer quick, visual solutions for threading woes. Meanwhile, blog posts like those from Easy Sewing for Beginners and Hopebroidery embed videos and photo sequences directly into step-by-step guides, providing a hybrid learning experience.
Key Takeaway: If you’re struggling with needle threaders, don’t just read about it—watch it. Seek out tutorials that offer close-up, stepwise instruction, real-time troubleshooting, and tool comparisons. Your eyes (and your patience) will thank you.
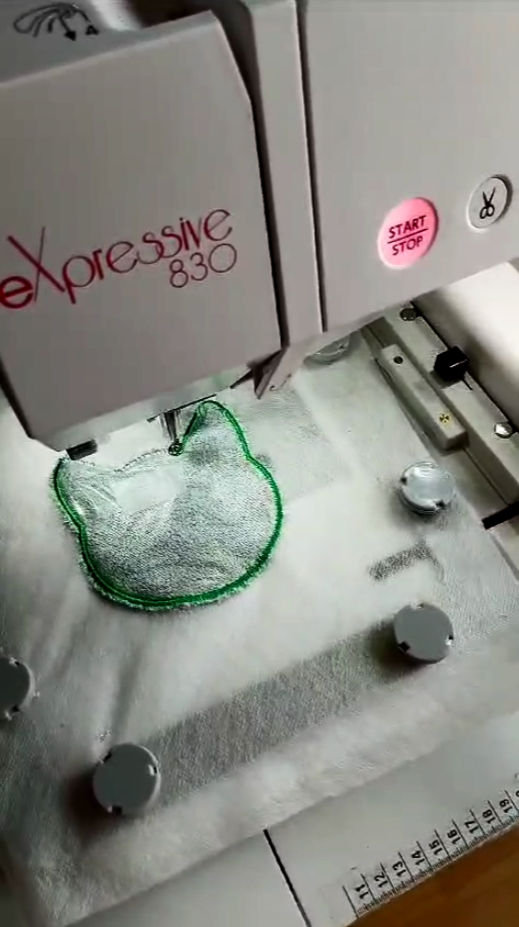
4.2 Machine-Specific Visual Guides
Not all machines—or their threaders—are created equal. That’s where machine-specific visual guides come into play, especially for brands like Brother and Baby Lock, whose threading mechanisms can be uniquely complex.
Brand Differences in Threading Mechanisms: Brother and Baby Lock machines often feature built-in, automatic needle threaders. Visual guides for these brands zoom in on the precise alignment of levers, hooks, and thread guides. For example, Brother’s official support videos and manuals show exactly how to position the needle at its highest point, lower the presser foot, and maneuver the threader lever so the hook catches the thread. These guides often highlight color-coded threading paths and numbered steps, making the process less intimidating.
Magnification and Clarity: Because the mechanisms are so small, creators recommend using extreme close-ups or even magnifying glasses to follow along. As one instructor notes, “If you look really really really close you can see that the eye of the needle is right here... and you can see that right here there's a little little tiny hook.” This level of detail is crucial for understanding how the threader’s hook interacts with the needle.
Complementing Hooping with MaggieFrame: Precise threading is only half the battle—fabric positioning matters just as much. Efficient hooping tools, like the MaggieFrame magnetic embroidery hoop, are a game-changer for garment embroidery. When combined with accurate threading, MaggieFrame’s powerful magnetic system ensures your fabric stays perfectly taut, reducing setup time and minimizing defects. This synergy between visual learning for threading and user-friendly hooping tools like MaggieFrame can dramatically streamline your embroidery workflow, especially on multi-needle machines.
Actionable Tip: When choosing a visual guide, look for one tailored to your specific machine model. And if you’re aiming for truly professional results, consider pairing your threading mastery with a hooping station like MaggieFrame for flawless fabric placement and efficient production.
5. Safety Protocols and Problem Prevention
Embroidery is a creative joy—but let’s keep it safe. Whether you’re threading by hand or using a machine’s built-in threader, a few essential safety habits can save your fingers, your eyesight, and your sanity. Here’s how to keep your workspace accident-free and your needle threader in peak condition.
5.1 Essential Safety Practices
Power Down, Safety Up: Rule number one: always turn off your machine before threading. This isn’t just a suggestion—it’s the top safety protocol in every reputable sewing manual and classroom guideline. A running machine can start unexpectedly, turning a simple threading job into a trip to the ER.
Hand Positioning: Keep your fingers at least one inch away from the needle at all times. As demonstrated in both school safety guides and YouTube tutorials, optimal hand placement is “back and away at 1:00,” well outside the danger zone. Never rush or reach under the needle, even for a quick adjustment.
Handwheel Alignment: Before threading, manually turn the handwheel to align the needle at its highest point. This ensures the threader mechanism operates smoothly and reduces the risk of accidental needle movement.
Workspace Awareness: Keep cords clear of your feet and chair legs, eyes on your work, and pins safely stowed in a pin cushion (not your mouth!). Only one person should operate the machine at a time, and if anything jams or sounds off, stop immediately and seek help.
Pin and Needle Safety: Never sew over pins—broken needles and flying metal are a real hazard. Always remove pins before the needle reaches them, and wear safety glasses if possible.
5.2 Threader-Specific Precautions
Thread Tension Management: Use the correct thread for your machine, fabric, and needle. Before threading, check for knots and tangles—these can damage both your needle and the delicate wire or hook of your threader.
Presser Foot Positioning: For most machines, lower the presser foot before threading to ensure the thread passes smoothly through the tension disks. However, when threading the upper thread, raising the presser foot can help the thread slip into place. Follow your machine’s manual for the correct sequence.
Avoid Forcing Incompatible Threads: Don’t try to muscle thick or decorative threads through a standard threader—they can bend the wire or hook, leading to frustrating repairs. If resistance is high, stop and check compatibility.
Gentle Handling: Needle threaders, especially wire loop types, are delicate. Use gentle, steady pressure and avoid bending or twisting the wire. If the hook or wire seems misaligned, pause and realign rather than forcing it.
Maintenance Matters: Keep your machine and threader clean. Lint and dust can interfere with the threading mechanism, so wipe down your tools regularly.
Beginner’s Wisdom: If you’re new to machine embroidery, take it slow. Practice threading with the power off, and don’t rush into complex projects until you’re comfortable with the basics. Mistakes are part of the learning curve—embrace them, but always put safety first.
6. Troubleshooting Common Threader Issues
Even the best needle threaders can hit a snag—literally. From bent hooks to stubborn threads, knowing how to diagnose and fix common problems will keep your embroidery running smoothly. Let’s break down the most frequent issues and their practical solutions.
6.1 Diagnosing Mechanical Failures
Bent Hooks and Audible “Pop”: If you hear a metallic “pop” or notice the threader lever feels rough, you may have a bent hook. This fragile part can be jarred by accidental bumps or by forcing thick threads through a small needle eye. When bent, the hook won’t pass cleanly through the needle, often missing the eye or pushing to the side.
Misalignment: If the threader isn’t lining up with the eye of the needle, check that your needle is installed correctly and raised to its highest position. Misalignment can also occur after machine servicing or accidental impacts.
Spring Damage: A damaged or missing spring in the threader mechanism can cause the wire or hook to fail to move smoothly. If the lever doesn’t glide as it should, inspect for broken or missing parts.
Repair Tips: For a bent hook, use a seam ripper or small screwdriver to gently nudge the hook back into place. Lower the threader lever and carefully guide the hook so it aligns with the needle’s eye. If you’re unsure or the damage seems severe, consult a professional repair technician—forcing repairs can make things worse.
6.2 Thread/Needle Compatibility Solutions
Needle Size Matters: Most needle threaders are designed for standard needle sizes (typically 75/11 to 100/16). If you’re using a needle that’s too large or too small, the threader may not align properly, leading to missed threads or mechanical strain.
Thread Thickness: Thick or decorative threads can overwhelm a standard threader, causing jams or even bending the wire. Always check your machine’s compatibility chart before threading specialty threads.
Avoid Forcing: If the thread resists, don’t force it. Forcing thick threads can deform the hook or break the wire. Instead, switch to a compatible thread or thread the needle by hand for specialty materials.
Step-by-Step Troubleshooting Checklist:
- Verify Needle Position: Ensure the needle is at its highest point.
- Check Thread Path: Make sure the thread isn’t caught on anything and follows the correct guides.
- Confirm Compatibility: Use the recommended needle and thread sizes.
- Inspect Mechanism: Look for bent hooks, misaligned levers, or damaged springs.
- Gentle Realignment: Use a seam ripper or small tool to adjust a bent hook.
When to Seek Professional Help: If you’ve tried all the above and the threader still won’t work, or if you notice broken or missing parts, it’s time to visit a repair specialist. Sometimes, a little expert attention is all your machine needs to get back on track.
Pro Tip: Regular maintenance and gentle handling are your best defenses against threader troubles. Treat your tools with care, and they’ll reward you with years of smooth, frustration-free embroidery.
7. Machine-Specific Optimization Techniques
Modern embroidery machines are marvels of engineering, but when it comes to threading, each brand brings its own quirks and optimization secrets. Mastering these brand-specific protocols—and adopting advanced, universal strategies—can elevate your needle threader’s performance from “just works” to “works like magic.” Let’s dive into the nitty-gritty of maximizing efficiency, minimizing frustration, and keeping your embroidery workflow humming.
7.1 Brand-Specific Threading Protocols
If you’ve ever watched a seasoned embroiderer thread a Brother or Baby Lock machine, you know: it’s part choreography, part science. Each brand has its own rhythm, and the smallest deviation can mean the difference between a seamless start and a snarl of thread.
- Thread Management During Color Changes: When swapping threads, always pull a generous length from the spool before tying a knot to the new color. This allows a tight, secure join—if your knot’s too loose, it’ll slip apart mid-threading (and yes, that’s as annoying as it sounds).
- Precision Alignment: Before engaging the automatic threader, press the needle up/down button twice to ensure the needle is at its absolute highest position. For Brother machines, both the needle and the take-up lever should be at their apex—this dual verification is critical for successful threading.
- Thread Path: Follow the marked guides and arrows. After threading, loop the thread around the front guide and down the designated path, letting the machine’s built-in cutter do its thing before activating the threader.
- Systematic Numbered Path: Baby Lock’s threading is a “connect-the-dots” experience—follow the numbers, under the guides, around the machine, and up over the take-up lever. It’s like a treasure map for your thread.
- Spool Orientation: Always place your thread spool so the thread unwinds from the bottom. This simple tweak can make or break your thread flow, keeping tension smooth and preventing tangles.
- Presser Foot Protocol: Start with the presser foot lifted to reduce tension, then lower it just before activating the threader. This sequence ensures the thread glides through the path and seats perfectly in the needle.
Key Takeaway: Brand-specific threading isn’t just about following instructions—it’s about precision and sequence. Skipping a step or misaligning a lever can lead to missed threadings, bent hooks, or even damaged needles. Embrace the choreography, and your machine will reward you with flawless starts every time.
7.2 Advanced Cross-Brand Strategies
No matter your machine’s make or model, a few universal best practices can supercharge your threading routine and protect your equipment for the long haul.
- Dual-Position Verification: Always check that both the needle and the take-up lever are at their highest positions before threading. If either is off, the threader hook can miss the eye or, worse, get bent.
- Needle and Thread Compatibility: Stick to needle sizes 70/10 (or 80/12) and above for automatic threaders. Avoid metallic, stiff, or extra-thick threads—if two thicknesses of your thread can’t pass through the needle’s eye, you’re risking a jam or breakage.
- Thread Tension Management: Leave a 6–8 inch thread tail when threading. Hold the thread across the eye—firm, but not too tight or loose—to help the hook catch and pull it through cleanly.
- Regular Maintenance: Embroidery machines work hard—especially multi-needle models. Clean your threader hook and surrounding area with a brush or tweezers more frequently than you would on a standard sewing machine. Regular inspections and gentle realignment (if needed) will keep your threader in top shape.
- PPSU-Material Hoops for High-Frequency Use: For garment embroidery, pairing your machine with a PPSU-material magnetic embroidery hoop like MaggieFrame can withstand the rigors of high-frequency use. MaggieFrame’s industrial-grade construction ensures stability and longevity, perfectly complementing the demands of advanced embroidery workflows in commercial embroidery machines for sale.
Pro Tip: Document your threading process and any adjustments you make for each project. Over time, you’ll build a personalized playbook that turns even the most complex threading scenarios into second nature.
8. Integrating Threaders into Embroidery Workflows
Needle threaders aren’t just a convenience—they’re a strategic asset when woven into your entire embroidery workflow. Whether you’re prepping for a multi-color masterpiece or racing against a production deadline, integrating your threader with smart pre-project routines and time-saving tools can transform your efficiency.
8.1 Pre-Project Optimization
Before the first stitch, a little prep goes a long way:
- Thread and Spool Preparation: For multi-needle machines, organize your threads and pre-load up to seven colors at once. This “thread staging” means you can breeze through intricate, multi-color designs without stopping to rethread after every color change.
- Needle Selection: Choose needles that match both your project and your threader’s compatibility—75/11 ballpoint embroidery needles are a safe bet for most jobs, offering a larger eye for smooth threading, especially with decorative threads.
- Systematic Threading Sequence: Follow the manufacturer’s path—load the spool, guide the thread through tension discs and the take-up lever, use the auto-threader, then pull about 4 inches of thread through the presser foot. This sequence keeps tension consistent and minimizes troubleshooting down the line.
- Visual Guidance: Many modern machines include arrows and numbered guides—lean on them. These visual cues make threading less intimidating and reduce errors, as confirmed by both hands-on reviews and user tutorials.
Actionable Step: Lower the presser foot before threading to secure the thread path and prevent tangles—a simple move that can prevent the majority of common threading mishaps.
8.2 Time-Saving Production Strategies
Efficiency isn’t just about threading fast—it’s about threading smart.
- Multi-Needle Machine Optimization: Threading multiple colors in advance on machines like the Janome MB-7 slashes color-change interruptions, letting you power through complex designs up to 40% faster.
- Workflow Synergy with Magnetic Hooping: Combine precision threading with a magnetic hooping system like MaggieFrame, and you’ll see garment setup time drop by up to 90%. This is particularly effective for embroidery machine for hats and shirts. MaggieFrame’s powerful magnets and ergonomic design keep fabric taut and aligned, while the threader ensures flawless starts—together, they can reduce defect rates by 15%, saving both time and material.
- Routine Checks and Troubleshooting: Integrate quick threading verification into your workflow. If you spot a break or tension issue, retrace the threading path using your machine’s visual guides. This proactive approach reduces downtime and keeps your production line moving.
| Workflow Integration Step | Benefit |
|---|---|
| Pre-load threads and needles | Fewer stops, faster color changes |
| Use visual threading guides | Reduces errors, speeds up learning curve |
| Pair with MaggieFrame magnetic hoop | 90% faster garment setup, 15% fewer defects |
| Routine threading checks | Less troubleshooting, more uptime |
Pro Tip: Treat needle threading as an integral part of your workflow, not a standalone task. The more seamlessly you incorporate it—especially with tools like MaggieFrame—the more your productivity and project quality will soar.
9. Conclusion
To get the most out of the best embroidery machines, mastering needle threaders is more than a technical skill—it’s a gateway to higher efficiency, fewer errors, and more joyful embroidery. By matching threader types to your materials, respecting brand-specific threading protocols, and leveraging advanced tools like MaggieFrame magnetic embroidery hoops, you can transform threading from a stumbling block into a strategic advantage. Prioritize safety, embrace your machine’s unique features, and integrate threading into your workflow for professional-level results. With these insights, you’re not just threading needles—you’re threading the path to embroidery excellence.
10. FAQ: Needle Threader Essentials
10.1 Q: How can I fix a bent wire needle threader?
A: If your needle threader’s wire becomes bent, don’t panic—gentle realignment is often all it takes. Use a small tool like a seam ripper or a fine-tipped tweezer to carefully nudge the wire back into its original shape. Avoid forcing it, as excessive pressure can cause the wire to snap. Practicing a light touch will help extend the life of your threader.
10.2 Q: What should I do if my thread is too thick for the needle threader?
A: Standard needle threaders are designed for regular cotton or polyester threads. If you’re working with thick, decorative, or specialty threads that won’t pass through the needle eye using the threader, switch to manual threading. Cut the thread at an angle and moisten the tip for easier insertion. For multi-strand floss or metallic threads, consider using a rigid hook-style threader, which handles extra thickness better than wire loops.
10.3 Q: How do I maintain an automatic needle threader?
A: Keep your automatic needle threader in top shape by regularly cleaning away lint and dust. Use a small brush or a blast of compressed air to clear debris from the threading mechanism. Always turn off the machine before cleaning or threading to prevent accidental injury. Periodically check for bent hooks or misalignment and gently realign if needed. Routine maintenance ensures smooth operation and extends your threader’s lifespan.
10.4 Q: Why won’t my needle threader work with some needles or threads?
A: Needle threaders—especially machine-integrated models—are typically compatible with standard needle sizes (usually 75/11 to 100/16) and regular threads. They may not work with twin needles, wing needles, or very thick/metallic threads. If you’re using specialty needles or threads, manual threading is recommended. Always consult your machine’s manual for compatibility guidelines to avoid damaging the threader.
10.5 Q: What’s the safest way to use a needle threader?
A: Safety first! Always turn off your sewing or embroidery machine before threading. Keep your fingers at least an inch away from the needle, and never force the threader if you feel resistance. Align the needle at its highest position and use gentle, steady pressure when operating the threader. Regularly inspect your threader for damage and replace it if the wire or hook is compromised.
10.6 Q: My automatic threader isn’t catching the thread—what should I check?
A: Start by ensuring the needle is at its highest position and that you’re using a compatible needle and thread. Double-check that the thread path follows your machine’s guides and that the presser foot is positioned correctly. Inspect the threader for bent hooks or misalignment, and gently realign if necessary. If problems persist, refer to your machine’s troubleshooting guide or seek professional servicing.
10.7 Q: How can I prevent my needle threader from breaking?
A: Handle your needle threader with care—especially wire loop types, which are delicate. Avoid using excessive force or threading incompatible threads. Store your threader in a safe place when not in use, and regularly clean it to prevent lint buildup. Following proper threading procedures and using the right tool for your thread and needle type will help prevent breakage and prolong your threader’s life, especially for those using a best beginner embroidery machine.