
1. Introduction to Vertical Needle Zipper Mastery
Precision. It’s the difference between a zipper that glides effortlessly and one that snags, puckers, or looks homemade. For embroidery professionals and garment creators, mastering vertical needle zipper techniques is the secret ingredient to flawless, professional results. This guide will unravel the mechanics behind vertical needle alignment, walk you through step-by-step zipper foot installation and adjustment, and share troubleshooting and creative applications that elevate your sewing. Whether you’re perfecting your embroidery projects or seeking that crisp, couture finish on garments, you’re about to discover how small adjustments can make a world of difference.
Table of Contents
- 1. Introduction to Vertical Needle Zipper Mastery
- 2. What 'Vertical Needle' Means in Zipper Contexts
- 3. Installing and Using Your Zipper Foot: Step-by-Step
- 4. Sewing Process for Both Sides with Precision
- 5. Preventing Puckering: The Science of Vertical Adjustment
- 6. Adjustable vs. Traditional Zipper Feet Compared
- 7. Creative Applications: Piping and Pom-Poms
- 8. Troubleshooting Common Vertical Zipper Issues
- 9. Conclusion: Elevating Your Zipper Technique
- 10. FAQ: Vertical Needle Zipper Essentials
2. What 'Vertical Needle' Means in Zipper Contexts
2.1 Technical Definition and Mechanics
Let’s demystify the term “vertical needle” in the world of zipper sewing. Contrary to what the phrase might suggest, it’s not about the needle moving up and down (that’s standard for all sewing). Instead, vertical needle alignment refers to the needle’s position along the vertical axis of the zipper teeth—achieved by shifting the needle left or right, not just keeping it centered.
Most modern sewing machines equipped with a zipper foot allow for this lateral (side-to-side) adjustment. Here’s how it works:
- Needle Positioning Controls: Many machines feature a sliding mechanism, dial, or even a digital setting that lets you move the needle to the far left or right. This ensures the needle can stitch close to the zipper teeth without colliding with the foot or the teeth themselves.
- Foot Notches and Groove Guidance: Zipper feet are designed with notched edges or grooved channels. These guide the needle through specific paths, so you can sew right next to the zipper teeth for a neat, professional finish.
- Mechanics in Action: For example, when attaching a zipper, you’ll move the needle to the right to sew one side, then shift it to the left for the other. This flexibility is crucial for both centered and lapped zipper applications and is especially handy when working with invisible zippers or decorative trims.
Compared to traditional horizontal methods (where the needle remains fixed and the fabric is manipulated), vertical needle alignment gives you far greater control and accuracy—especially on curved or angled zipper installations.
2.2 Key Advantages Over Traditional Methods
Why bother with vertical needle adjustment? The benefits are clear:
- Stitching Within 1–2mm of Zipper Teeth: Vertical alignment lets you sew remarkably close to the zipper teeth, producing a clean, almost invisible finish. Traditional methods often leave a wider gap, compromising appearance and function.
- Reduced Needle Breakage: By aligning the needle precisely, you avoid accidental collisions with the zipper foot or teeth—a common cause of breakage in less precise setups.
- Curved Zipper Adaptability: Need to sew a zipper around a curve or angle? Vertical alignment makes it possible, while fixed horizontal approaches struggle to maintain accuracy.
- Efficiency and Durability: With vertical needle alignment, you can sew continuously along the zipper without constantly stopping to remove pins or adjust fabric. The result? Faster sewing and less wear on your machine.
Here’s a quick comparison to put things in perspective:
| Aspect | Vertical Needle Alignment | Traditional Approaches |
|---|---|---|
| Precision | Stitch within 1–2 mm of zipper teeth | Broader, less precise stitching lines |
| Efficiency | Continuous sewing, fewer interruptions | Frequent pin removal, slower progress |
| Durability | Minimizes needle breakage | Higher risk of needle or foot damage |
| Flexibility | Handles curves and angles with ease | Limited to straight, simple seams |
By embracing vertical needle techniques, you’re not just improving aesthetics—you’re building garments and embroidery projects that stand up to scrutiny and daily use.
3. Installing and Using Your Zipper Foot: Step-by-Step
3.1 Foot Attachment and Needle Positioning
Ready to put theory into practice? Let’s start by installing your zipper foot and dialing in the perfect needle position:
1. Remove the Standard Presser Foot: Most machines have a simple release mechanism or screw. Detach the regular foot to make room for the zipper foot.
2. Attach the Zipper Foot: Align the groove of the zipper foot with the needle bar. Secure it tightly—some models use a screw, others snap into place.
3. Adjust Needle Position:
- Modern sewing machines embroidery models feature precise lateral adjustment dials or digital settings; move the needle to the far left or right, depending on which side of the zipper you’re sewing.
- Some zipper feet feature an orange tag or sliding mechanism; loosen it, slide the foot to the desired side, and retighten.
4. Stability Check: Give the foot a gentle wiggle to ensure it’s locked in place. A loose foot can lead to skipped stitches or needle hits.
YouTube Insight: Several tutorials show how the zipper foot’s notches allow the needle to pass safely on either side. If your machine has a screw or lever (as seen in the “Attaching Zipper Foot: Sewing Machine” video), use it to fine-tune the foot’s position for maximum control.
3.2 Vertical Alignment Techniques
With your zipper foot installed, it’s time to master vertical alignment:
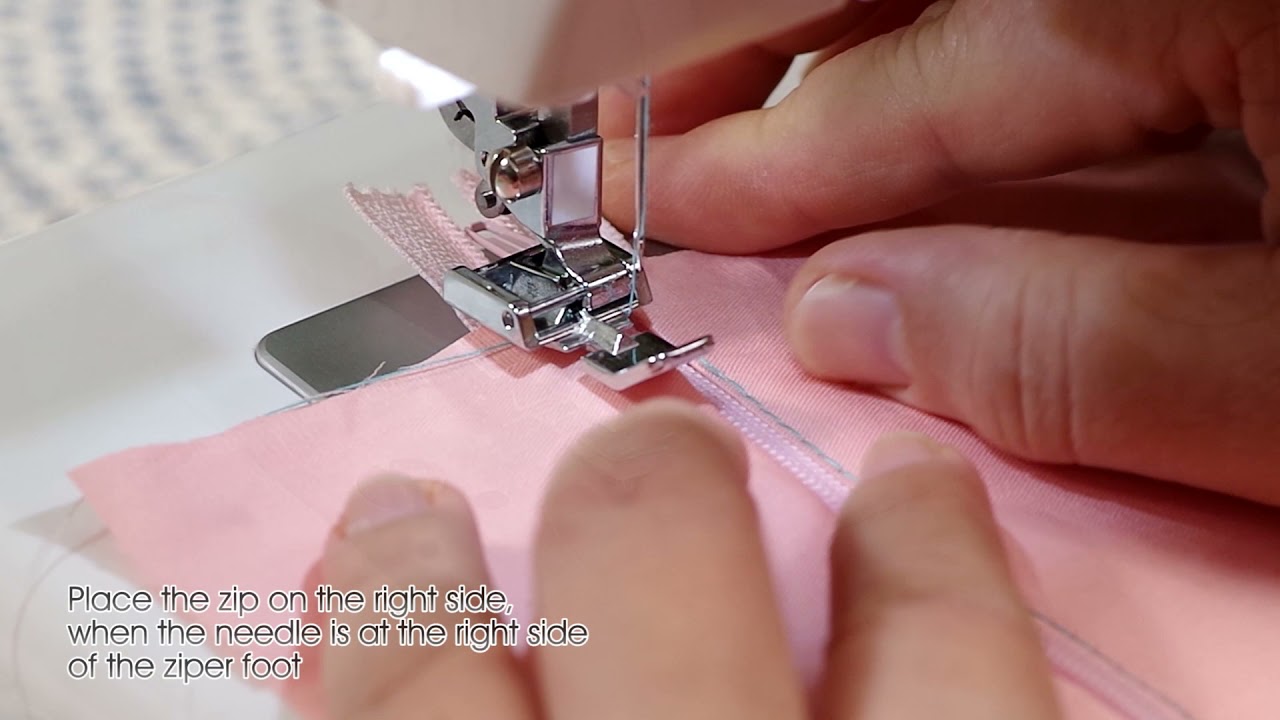
1. Align Needle Indent with Zipper Teeth: Place your fabric and zipper under the foot so the needle lines up with the edge of the zipper teeth—not too far away, not so close that it risks hitting metal or plastic.
2. Manual vs. Computerized Adjustments:
- Manual Machines: Use the adjustment dial, lever, or foot slider to move the needle.
- Computerized Machines: Use digital controls to shift the needle position; fine-tuning may still be required.
3. Hand-Crank Testing: Before you start stitching, always turn the hand wheel manually to lower the needle. Watch closely—does the needle pass cleanly through the foot’s groove without touching the zipper teeth? If not, adjust and test again.
4. Avoiding Teeth Contact: Perplexity and YouTube experts agree: It’s better to err on the side of a slightly wider stitch than to risk the needle hitting the zipper teeth. This prevents warping, breakage, and frustration.
Once you’ve confirmed smooth movement, you’re ready to sew zippers with confidence and precision—no more guesswork, no more uneven seams.
Curious about how these techniques play out on different fabrics or zipper types? Stay tuned for the next sections, where we’ll dive into sewing both sides of a zipper, troubleshooting, and creative applications that will make your projects stand out.
4. Sewing Process for Both Sides with Precision
Achieving a flawless zipper installation is all about precision—on both sides. Let’s break down the process, from managing the slider to mirroring your technique for a perfectly aligned finish, with expert tips for every fabric type.
4.1 First Side Stitching and Slider Management
Start by pinning or taping your zipper in place, ensuring the teeth align exactly with your seamline. For best results, many seasoned sewists swear by double-sided tape—it keeps the zipper flat and eliminates the bubbles and shifting that sometimes plague masking tape, as highlighted in YouTube tutorials. This simple trick makes your zipper area as smooth as glass, setting you up for a professional finish.
When you’re ready to sew, position your zipper foot so the needle falls just beside the zipper teeth. Begin with a few backstitches at the top—this anchors your seam and prevents unraveling. As you sew, keep your stitches snug along the edge of the zipper tape, letting the foot’s groove guide you straight and true.
But what about the slider? Here’s where a little finesse comes in. As you approach the slider, pause with your needle down, lift the presser foot, and gently slide the zipper pull out of the way. Lower the foot and continue sewing. This maneuver keeps your seam uninterrupted and your stitches even.
For heavy fabrics, consider using a walking foot alongside your zipper foot, or tweak your tension for smoother feeding. On delicate materials, reduce presser foot pressure to avoid distortion. And always—always—test your setup on a scrap first to confirm your needle clears the teeth and your alignment is spot-on.
4.2 Mirroring Techniques for Second Side
Now for the second act: achieving symmetry. Advanced sewing machine with embroidery capabilities simplifies zipper foot adjustments to the opposite side, or adjust your needle position as needed. This ensures you can sew close to the teeth from the other direction, mirroring your first seam.
Before you stitch, double-check your seam allowance and fabric alignment. Consistency here is key—matching seam allowances on both sides keeps your zipper centered and your project looking sharp.
If you’re working with thick or slippery fabrics, stabilizers are your secret weapon. Tear-away or adhesive stabilizers keep everything in place, preventing shifting and puckering. YouTube demonstrations often show the magic of slow-speed sewing and careful pivoting at zipper stops—take your time, especially around corners or at the zipper base.
When you reach the bottom, pivot your fabric to sew across the zipper stop without stitching into it. This technique, borrowed from both Perplexity guidance and video tutorials, ensures your zipper stays functional and your finish is crisp.
With both sides sewn, press your seams for a polished look. Whether it’s a tote, pouch, or garment, these steps guarantee your zipper sits flat, functions smoothly, and looks as good inside as it does out.
5. Preventing Puckering: The Science of Vertical Adjustment
Puckering can sabotage even the most carefully sewn zipper. The secret to a smooth, distortion-free finish? Mastering vertical needle alignment and smart fabric handling.
5.1 How Vertical Alignment Eliminates Distortion
Vertical needle adjustment is your first line of defense against puckering. By aligning the needle precisely with the zipper foot’s groove, you ensure the fabric is pulled evenly on both sides of the seam. This balance prevents uneven tension—a common culprit behind those unsightly gathers and waves.
The type of zipper foot you use matters, too. Adjustable feet, especially those designed for vertical needle machines, allow you to fine-tune the needle’s position for both centered and lapped zippers. This flexibility means you can stitch close to the teeth without distorting the fabric, regardless of zipper style.
But what about stabilizing your fabric before you even start sewing? That’s where magnetic embroidery hoops like MaggieFrame come in. When prepping garments for embroidery—especially those destined for zipper installation—MaggieFrame’s powerful magnetic clamping system holds your fabric taut and evenly tensioned. Proper hoop sizes ensure optimal tension for zipper installations. This minimizes movement and puckering during both embroidery and zipper insertion, giving you a perfectly flat surface to work with.
In short, combine precise vertical alignment with the right foot and reliable fabric stabilization, and puckering becomes a problem of the past.
5.2 Stabilizers and Fabric Handling
The right stabilizer can make or break your zipper project. Tear-away stabilizers are a favorite for their easy removal and reliable support, especially on woven fabrics. For knits or stretch materials, a bit of basting stitch can help hold everything in place until your zipper is firmly sewn.
Thread tension also plays a crucial role. Aim for a top-to-bobbin thread tension ratio around 2:1, but always test on a scrap first—different fabrics may require slight tweaks. Select a sharp, size-appropriate needle, such as an 80/12 for medium-weight fabrics, to avoid dragging or skipped stitches.
Adhesive sprays are another pro tip from YouTube experts. A light mist holds layers together without gumming up your needle, making for smooth, even stitching. And don’t rush—slower machine speeds give you more control, especially when navigating thick seams or intricate designs.
With these strategies—stabilizer, tension, needle choice, and patience—you’ll conquer puckering and achieve that coveted professional finish every time.
6. Adjustable vs. Traditional Zipper Feet Compared
Choosing the right zipper foot can elevate your sewing from "good enough" to "expert-level." Let's compare adjustable and traditional models, so you can pick the perfect tool for your next project.
6.1 Precision and Versatility Analysis
Adjustable zipper feet offer unmatched control. Thanks to screw-based alignment mechanisms, you can fine-tune the foot's position relative to the needle and zipper teeth. This means you can sew closer to the teeth, reduce the risk of needle breakage, and handle thick or layered fabrics with ease. Teflon-coated soles are a bonus, gliding smoothly over sticky materials like vinyl or leather.
Traditional zipper feet, by contrast, usually feature a fixed snap-on design. While they're quick to attach and great for basic zipper installations, their bulkier profile can make it tricky to sew right up against the teeth-especially on narrow seams or specialty projects.
Here's a quick comparison:
| Feature | Adjustable Feet | Traditional Feet |
|---|---|---|
| Setup | Requires initial adjustment (screws/brackets) | Quick snap-on attachment |
| Learning Curve | Moderate (adjustment needed) | Low (plug-and-play design) |
| Stitching Consistency | Higher (customizable pressure) | Lower (fixed pressure) |
| Fabric Compatibility | Excellent (handles thick, sticky, or layered fabrics) | Limited (struggles with specialty materials) |
| Versatility | Great for zippers, piping, and snap tape | Primarily for standard zippers |
If your projects demand precision-think hidden zippers, piping, or working with tricky materials-adjustable feet are your best bet. For everyday zippers on standard fabrics, traditional feet get the job done with minimal fuss.
6.2 Machine Compatibility Guide
Compatibility is key. Adjustable zipper feet often come in low-shank models, making them a fit for machines like the Singer Featherweight and other brands with universal shank attachments. Some specialty machines-like the Janome Skyline S6-may require an adapter, so always check your machine's specs before purchasing.
Traditional feet, meanwhile, are often included with popular machines (such as Brother or Singer Heavy Duty models) and snap on easily. They're widely available and generally plug-and-play, but their functionality is limited to basic zipper tasks.
The best sewing machine for embroidery and sewing handles both industrial and home projects. Home sewists working on simple garments may find traditional feet more than sufficient.
In summary: match your foot to your machine and your project. Adjustable feet deliver versatility and precision, while traditional models offer simplicity and speed. Choose wisely, and your zipper work will always be a cut above.
7. Creative Applications: Piping and Pom-Poms
Adding piping or pom-poms to your projects isn’t just about flair—it’s about mastering techniques that deliver both beauty and durability. With a zipper foot and vertical needle alignment, you can achieve crisp, professional finishes on even the most challenging edges and curves. Let’s break down the best methods and material strategies for these decorative touches.
7.1 Edge Alignment Techniques
The zipper foot is your secret weapon for attaching piping and pom-poms with pinpoint accuracy. Its slim profile allows you to stitch right next to the piping cord or pom-pom trim, maintaining a tight 1–2mm seam allowance for that polished, store-bought look.
Here’s how to get it right:
- Aligning the Edge: Place your piping or pom-pom trim along the fabric edge, then position the zipper foot so the needle sits just beside the cord or trim. Adjust the needle position (left or right) to hug the edge closely—this is where vertical needle control shines, letting you fine-tune your stitch placement for a snug fit.
- Controlling Stitch Allowance: Use the foot’s groove as a guide, keeping your seam allowance consistent as you sew. This not only secures the trim but also prevents fabric distortion, especially on curves or corners.
- Curved Areas and Corners: For curves, clip the seam allowance of your piping or trim so it bends smoothly. Take shorter stitches and go slow—YouTube tutorials emphasize the value of patience and precision here. When pivoting at corners, stop with the needle down, lift the foot, and rotate your fabric for a flawless transition.
- Step-by-Step in Action:
1. Turn your project inside out and secure the trim with clips or a dab of fabric glue.
2. Stitch along the edge with the zipper foot, keeping the needle as close as possible to the piping or pom-poms.
3. For a super-snug finish, make a second pass, moving the needle even closer on the final seam.
Using machine embroidery digitizing software helps perfect trim placement for decorative edges.
- Design Considerations: Modern trends favor placing decorative trims about 1 inch below garment seams—think shoulder sprays or chest wedges for a contemporary twist.
With these techniques, you’ll achieve both functional security and decorative flair, even on tricky, curved garment edges.
7.2 Material-Specific Strategies
Not all fabrics—and not all trims—play by the same rules. Here’s how to adapt your approach for different materials and keep your results professional:
- Needle and Thread Selection:
- For woven fabrics, a size 75/11 embroidery needle works well.
- For knits, switch to a ballpoint needle to avoid snags and runs.
- Use strong, color-matched thread for durability and a seamless look.
- Stabilizer Recommendations:
- On lightweight or stretchy fabrics, apply a fusible interfacing or cutaway stabilizer to the seam area. This prevents stretching and distortion when adding piping or pom-poms.
- For heavier materials, reinforce with a sturdier stabilizer to support the extra bulk.
- Hooping for Embroidery Bases: When your project involves embroidery before adding piping or trims, fabric stability is everything. That’s where MaggieFrame magnetic embroidery hoops come into play. By holding your garment base taut and evenly tensioned, MaggieFrame hoops ensure your fabric stays perfectly flat throughout embroidery and decorative finishing. This even tension means your piping or pom-poms will sit smoothly—no puckering, no shifting, just crisp, professional edges.
- Practical Tips:
- Secure excess fabric with clips to keep your work area clear.
- For curved seams, use shorter stitches to maintain contour and avoid bunching.
- Always test your setup on a scrap to fine-tune needle position and tension.
By pairing the right needle, stabilizer, and hooping method, you’ll conquer any material—delicate or heavy, knit or woven—and deliver results that wow.
8. Troubleshooting Common Vertical Zipper Issues
Even seasoned sewists encounter hiccups—broken needles, fabric jams, and uneven stitches can throw off your groove. But with a systematic approach and a few pro tricks, you’ll keep your vertical zipper installations running smooth, no matter the fabric or trim.
8.1 Solving Needle Breakage and Fabric Jams
Needle breakage and fabric jams are often the result of small missteps, but they’re easy to fix once you know what to look for.
Common Causes and Solutions:
- Improper Threading: Misaligned threads can disrupt tension and stress the needle. Always re-thread your machine with the presser foot up and the needle in its highest position, ensuring the thread follows every guide.
- Fabric Tugging: Resist the urge to pull fabric through—let the feed dogs do the work. Pulling creates uneven resistance, upping the risk of breakage.
- Presser Foot Pressure: Too much pressure jams thick fabrics; too little causes slippage. Adjust the pressure screw—clockwise for more, counterclockwise for less—until your fabric feeds smoothly.
- Needle Choice: Match your needle to your material: heavy-duty needles for thick fabrics, sharp needles for slippery ones.
- Machine Cleanliness: Lint and debris can snag threads and jam needles. Professional embroidery machine repair services recommend regular cleaning to prevent friction.
- Zipper Coil Alignment: Stitching too close to the coil can catch teeth and halt progress. Test your alignment on scrap fabric, and for invisible zippers, manually guide the coil away as you sew.
| Issue | Critical Factors | Solutions |
|---|---|---|
| Needle Breakage | Improper threading, fabric tugging, wrong needle type | Re-thread, adjust pressure, use correct needle |
| Fabric Jams | Thick materials, coil misalignment, foot instability | Test alignment, guide coil, stabilize foot |
By addressing these factors, you’ll dramatically reduce the risk of mid-project mayhem.
8.2 Fixing Uneven Stitching on Challenging Fabrics
Uneven stitches can mar even the most careful zipper work, especially on slippery or heavy materials. Here’s how to get your stitches back on track:
- Tension Rebalancing: Uneven tension between top and bobbin threads is a common culprit. Re-thread both with the presser foot up, ensuring the thread seats properly in the tension discs.
- Needle Proximity Adjustment: If your needle is too far from the zipper coil or foot groove, stitches will wander. Adjust the needle position so it sits as close as possible to the coil without touching it.
- Material Stabilization: Slippery fabrics like satin are notorious for shifting. Use pins, interfacing, or adhesive stabilizer to anchor material before sewing.
- Manual Guidance: For tricky spots, slow down and guide the fabric by hand, especially at the start and end of seams.
| Issue | Critical Factors | Solutions |
|---|---|---|
| Uneven Stitching | Tension imbalance, needle position, material slippage | Re-thread, adjust needle, stabilize fabric |
Preventative Measures:
- Clean your machine regularly to avoid friction and jams.
- Inspect zippers before installation—make sure sliders move smoothly.
- Always match needle type and presser foot pressure to your fabric’s weight and texture.
With these troubleshooting strategies, you’ll handle even the most challenging zipper installations with confidence.
9. Conclusion: Elevating Your Zipper Technique
Mastering vertical needle zipper techniques is about more than just installing hardware—it’s about precision, stabilization, and the right tool for every job. By honing your alignment skills, selecting the best foot for your project, and practicing on scrap fabric, you’ll unlock professional results across garments and embroidery projects alike. Keep experimenting, stay patient, and watch your sewing confidence—and your finished pieces—rise to new heights.
10. FAQ: Vertical Needle Zipper Essentials
10.1 Q: Can I use regular presser feet for zippers?
A: No, regular presser feet are not designed for zipper installation. Zipper feet feature a narrow profile and side grooves that let you sew close to the zipper teeth, ensuring precise, professional results. Using a standard presser foot will prevent you from getting close enough, often resulting in uneven seams and a less polished finish.
10.2 Q: How do I prevent fabric puckering when sewing zippers?
A: To prevent puckering, use stabilizers and control your thread tension. Tear-away stabilizers provide support for lightweight or stretchy fabrics, while basting stitches help hold everything in place. Adjust your thread tension—aim for a balanced ratio (such as 2:1 top to bobbin)—and always test on a scrap first. Slower sewing speeds and the right needle size also help keep your stitches smooth and distortion-free.
10.3 Q: What needle size works best for sewing zippers?
A: For medium-weight fabrics, a size 80/12 needle is recommended. This size delivers the right balance of strength and precision, minimizing skipped stitches and fabric damage. For heavier materials, opt for a larger needle; for delicate fabrics, a smaller, sharper needle may be preferable. Always match your needle to both the fabric and the zipper type for best results.
10.4 Q: Can I sew both sides of a zipper without moving the needle?
A: It depends on your zipper foot. Adjustable zipper feet let you reposition the foot itself, so you can sew both sides without changing the needle position. Traditional feet may require you to move the needle or reattach the foot to the opposite side. Either way, always check alignment before stitching for consistent, even seams.
10.5 Q: What’s the best way to handle the zipper slider while sewing?
A: As you approach the zipper slider, pause with your needle down, lift the presser foot, and gently move the slider out of the way. Lower the foot and continue sewing. This keeps your seam straight and prevents skipped stitches or snags.
10.6 Q: Do I need a special foot for invisible zippers?
A: Yes, invisible zippers are best installed with a dedicated invisible zipper foot. This foot features grooves that hold the zipper coils flat, allowing the needle to stitch right next to them for a truly hidden finish. While a standard zipper foot can work in a pinch, the results are rarely as seamless.
10.7 Q: How do I avoid needle breakage when installing zippers?
A: Make sure your needle is properly aligned with the zipper foot groove and not too close to the zipper teeth. Use the correct needle size for your fabric, and avoid pulling the fabric as you sew—let the machine’s feed dogs do the work. Regularly clean your machine to prevent lint buildup, which can cause jams and breakage.
10.8 Q: Can I use a zipper foot for piping or decorative trims?
A: Absolutely! Zipper feet are perfect for attaching piping, cording, or pom-pom trims. Their narrow shape lets you sew snugly alongside decorative elements, giving you a crisp, professional edge on both straight and curved seams.
10.9 Q: What’s the difference between adjustable and traditional zipper feet?
A: Adjustable zipper feet let you fine-tune the foot’s position relative to the needle, offering greater versatility for different zipper types, piping, and trims. Traditional feet have a fixed position and are best for standard zipper installations. If you work with a variety of projects or fabrics, an adjustable foot is a smart investment.
10.10 Q: Should I practice before sewing zippers on my final project?
A: Absolutely. Practicing on scrap fabric helps you fine-tune your needle position, tension, and foot alignment. It’s the best way to avoid mistakes and ensure a flawless finish on your main project.