
1. Introduction to Cap Embroidery
Embroidering a cap is like painting on a moving canvas—curved, structured, and full of personality. Unlike flat garments, caps challenge embroiderers with their rounded surfaces and stubborn seams, making both hand and machine embroidery uniquely demanding. But don’t let that intimidate you! Mastering cap embroidery with the best embroidery machine opens a world of custom style, from monogrammed dad hats to intricate floral baseball caps.
In this guide, you’ll discover step-by-step techniques for both hand and machine embroidery, learn how to select the right materials and tools, and get troubleshooting advice for common pitfalls like puckering or seam interference. Whether you’re a curious beginner or a seasoned stitcher, you’ll find practical tips to elevate your cap embroidery game and create wearable art that stands out. Ready to transform a plain cap into something extraordinary? Let’s dive in.
Table of Contents
- 1. Introduction to Cap Embroidery
- 2. Step-by-Step Cap Embroidery Techniques
- 3. Essential Materials and Tools
- 4. Solving Common Technical Challenges
- 5. Design Placement and Customization
- 6. Hand vs. Machine Embroidery Comparison
- 7. Advanced Techniques and Solutions
- 8. Conclusion: Mastering Cap Embroidery
- 9. FAQ
2. Step-by-Step Cap Embroidery Techniques
Embroidering on caps requires a blend of patience, precision, and the right approach for your chosen method. Below, you’ll find expert advice for both hand and machine embroidery—each with its own set of techniques to help you conquer those tricky curves and seams.
2.1 Hand Embroidery Essentials: Hooping and Stitching
Hand embroidery on caps is accessible, portable, and perfect for personalizing one-off pieces. The secret to success? Mastering the art of hooping and choosing stitches that adapt to the cap’s shape.
Hooping Methods
- Choose the Right Hoop: Use a 3- or 4-inch embroidery hoop—flexi or wood hoops work well. Anything larger simply won’t fit inside most caps (Crewel Ghoul).
- Placement: Separate the inner and outer rings. Slide the inner ring inside the cap beneath your target area, then place the outer ring on top. Tighten the screw, ensuring the fabric is taut but not overstretched (Swoodson Says, Pretty Life Girls).
- Stabilize: For extra security, especially with small stabilizer pieces, use a basting stitch around the stabilizer’s edge (Crewel Ghoul).
Stabilizer Use
- Water-Soluble Stabilizer: Sulky Fabri-Solvy is a favorite for hand embroidery on hats. Print your design directly onto the stabilizer, trim, peel off the backing, and press onto the cap. After stitching, rinse thoroughly with warm water to remove residue and let the cap air dry (Swoodson Says, Crewel Ghoul).
- Pre-Wash: If you plan to wash the cap later, prewash it first to prevent shrinkage from distorting your embroidery (Swoodson Says).
Stitching Techniques
- Back Stitch & Satin Stitch: These are your go-to stitches for most cap designs. Back stitch outlines, while satin stitch fills shapes and adds dimension (Pop Shop America, Pretty Life Girls).
- French Knots: Ideal for textured centers in floral motifs (Crewel Ghoul).
- Thread Management: Tie off each color on the inside as you finish, leaving long tails to trim at the end (Dalix).
- Seam Navigation: The center seam can be tough—use a leather thimble or needle grip-its to protect your fingers and improve control (Crewel Ghoul).
Tips for Success
- Mark your design placement before hooping for accuracy, especially with text.
- Keep designs simple and practice on scrap fabric if you’re new to hand embroidery on hats.
- Don’t stress about perfection—if a stitch goes awry, just remove it and try again!
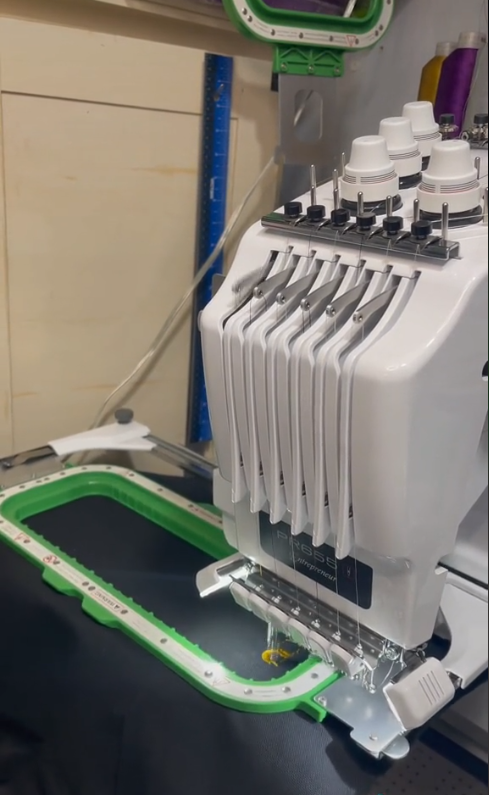
2.2 Machine Embroidery Setup: Frames and Alignment
Machine embroidery brings speed and precision, but cap embroidery demands specialized setup to handle curves and seams. Here’s how to get it right, whether you’re using a home or commercial machine.
Cap Frame Installation
- Specialized Cap Frames: Use a cap frame or driver designed for your embroidery hats machine (e.g., Melco SUMMIT, PRCF3 for Brother, Ricoma 1501-TC). These frames hold the cap securely and accommodate its curved shape (Melco Embroidery, Ricoma).
- Hooping Process: Place a piece of hat backing (tear-away stabilizer) on the cap hoop. For structured caps, one layer is usually enough; for unstructured caps, double up for added stability. Slide the cap onto the hoop, align the bill, and secure the strap and latch. Adjust tension using the wing nuts as needed (Melco Embroidery Video).
Driver Adjustments
- Install Cap Driver: Attach the cap driver to your machine, ensuring it’s level and properly aligned. Adjust the height using business cards as spacers, and tighten screws in a cross pattern for even pressure (Melco Embroidery Video).
- Presser Foot Height: Adjust according to cap thickness—higher for thick caps, lower for thin ones.
Design Placement & Alignment
- Marking & Centering: Mark the center of your design area using a template or marking tool. Align the cap so the design sits about half an inch above the bill, centered on the seam (Brother PE800 Video, Melco Embroidery Video).
- Machine Settings: Select the appropriate hoop or cap driver on your machine. Rotate the design 180° if needed so it stitches right-side up on the cap. Adjust sew speed (typically around 900 stitches per minute for hats) and active feed settings based on cap thickness.
- Laser/Camera Alignment: Some machines offer laser or camera alignment—use these features to precisely position your design.
- Trace Before Stitching: Always trace the design outline with your machine to confirm placement and avoid surprises.
Loading & Unloading
- Load the hooped cap by turning the bill sideways to fit behind the needle case, then rotate upright. Secure with latches and clips.
- After stitching, reverse the process to remove the cap.
Pro Tips
- For unstructured caps, pull the fabric a bit tighter and use included clips for extra hold.
- Always remove any cardboard or inserts from the cap before hooping.
With careful setup and attention to detail, machine embroidery on caps can produce crisp, professional results—even on those tricky curves!
3. Essential Materials and Tools
Choosing the right materials and tools is the foundation of flawless cap embroidery. From stabilizers to needles and hoops, each element plays a critical role in your success.
3.1 Stabilizers and Needles: Choosing Wisely
Stabilizers
- Tear-Away Stabilizer: Best for structured caps (like baseball caps). It supports the fabric during stitching and is easily removed after embroidery, leaving no residue. Self-adhesive tear-away stabilizers are especially helpful for keeping the cap in place (SewingMachineFun, Ricoma).
- Cutaway Stabilizer: Ideal for unstructured caps (like dad hats) or stretchy fabrics. It remains behind the design for ongoing support and works well when paired with an adhesive spray.
- Water-Soluble Stabilizer: Perfect for hand embroidery or delicate fabrics. It rinses away completely, leaving only your stitches behind (Swoodson Says, Crewel Ghoul).
Needles
- Standard Embroidery Needles: Suitable for most cap fabrics.
- Heavy-Duty or Sharp Needles: Recommended for thick or dense materials (e.g., trucker hats, laminated backs). Sizes like 80/12 or 90/14 are commonly used for tougher jobs (WeAllSew).
Pro Tips
- Always match your needle type and size to the cap’s fabric and the density of your design.
- Replace needles regularly to avoid snags and ensure clean stitching.
3.2 Hoop Selection: 4x4 vs. Specialized Cap Frames
Not all embroidery hoop frames are created equal—your choice depends on the cap’s structure and your embroidery machine.
| Hoop Type | Use Case | Limitations | Machine Compatibility |
|---|---|---|---|
| 4x4 Flat Hoop | Unstructured caps (dad hats, soft caps) | Limited embroidery area (~4" x 4"); can’t stitch near the brim | Brother SE1900, Ricoma 1501-TC |
| Specialized Cap Frame (e.g., PRCF3) | Structured caps (baseball caps) | Machine-specific; higher cost | Brother PRS100, Ricoma commercial machines |
Key Considerations
- Structured Caps: Require precise tension and specialized frames to avoid misalignment or needle breaks.
- Unstructured Caps: Can use 4x4 hoops, but may need adhesive spray for stability.
Cap Compatibility Table
| Cap Type | Embroidery Area | Hoop Requirements | Design Complexity |
|---|---|---|---|
| Structured (baseball caps) | ~2.5" x 3" (front panel) | Specialized cap frames (PRCF3) | Logos, monograms, small designs |
| Unstructured (dad hats) | Up to 4" x 4" | 4x4 flat hoop + adhesive spray | Larger designs, text |
Additional Tools
- Hat Hooping Station: Helps position caps consistently for repeat jobs.
- Embroidery Software: Programs like Chroma make it easier to digitize and align designs.
By aligning your material and tool choices with your cap’s structure and your machine’s capabilities, you’ll achieve professional, frustration-free results—no matter where your embroidery journey takes you.
4. Solving Common Technical Challenges
Every cap embroiderer—whether wielding a needle by hand or running a high-tech machine—faces a familiar set of technical hurdles. Fabric puckering, stubborn center seams, and the delicate dance of stabilizer removal can turn a simple project into a test of patience. But with the right strategies, you can conquer these challenges and achieve crisp, professional results every time.
4.1 Preventing Puckering and Seam Interference
Puckering is the arch-nemesis of cap embroidery, often caused by mismatched stitch density, improper stabilizer choice, or incorrect thread tension. Overly dense stitching can distort the fabric, while too little density leaves unsightly gaps. Here’s how to keep your cap smooth and your stitches flawless:
- Optimize Stitch Density: Use best digitizing software for embroidery to simulate your design and adjust stitch density to suit the cap’s fabric thickness. Thicker caps generally require lower density to avoid strain, while lighter fabrics may need a denser fill for definition.
- Choose the Right Stabilizer: For structured caps, a tear-away stabilizer works best, while unstructured or stretchy caps benefit from cut-away or water-soluble options. Double up on stabilizer layers around the center seam for added support when needed.
- Control Thread Tension: Over-tensioned threads can pull the fabric, creating puckers. Under-tensioned threads, on the other hand, result in loose, messy stitching. Always test on a scrap cap and fine-tune your tension settings before starting the real project.
- Hoop with Care: Make sure the fabric is taut in the hoop but not overstretched. Loose hooping leads to shifting and distortion, while over-tightening can warp the cap’s shape.
- Slow Down the Machine: Reducing your machine speed (to around 600–700 stitches per minute) helps prevent needle skipping and uneven stitching, especially on thick or curved surfaces.
- Use the Right Needle: Sharp-point needles are ideal for tightly woven caps, while ballpoint needles suit softer, knit fabrics. For thick or laminated caps, consider heavy-duty options like 80/12 or 90/14.
Seam interference—especially at the center seam—can throw off your design’s alignment and cause registration errors. To navigate this tricky terrain:
- Digitize Designs Center-Out: Start stitching at the cap’s base and work outward. This technique minimizes fabric deflection and keeps your design aligned, even when crossing seams.
- Frame Adjustment: Ensure your hoop or cap frame matches the cap’s thickness. Tight frames can distort fabric, while loose frames allow shifting.
- Seam Stabilization: Reinforce seams with cut-away stabilizer for stretchy fabrics, maintaining alignment throughout the stitching process.
- Leather Thimbles for Hand Embroidery: If you’re stitching by hand, use a leather thimble or needle grip-its to protect your fingers and help push the needle through tough seams.
By addressing puckering and seam interference head-on, you’ll achieve embroidery that looks as good up close as it does from across the room.
4.2 Stabilizer Removal Best Practices
The final flourish of any embroidery project is removing the stabilizer without damaging your hard work. Each stabilizer type demands a gentle, methodical approach:
- Tear-Away Stabilizer: Ideal for cotton and stable fabrics. After stitching, gently peel the stabilizer away from the back, taking care not to tug on the fabric or stitches. If small fragments remain, use tweezers for precise removal.
- Cut-Away Stabilizer: For stretchy or delicate caps, trim excess stabilizer with curved scissors, leaving a small margin behind the design for ongoing support. Avoid aggressive trimming, which can nick threads or fabric.
- Water-Soluble Stabilizer: Perfect for lightweight or sheer fabrics. Soak the cap in warm water to dissolve the stabilizer, then rinse thoroughly to remove all residue. Let the cap air dry—balling up a towel inside helps retain its shape.
- Pre-Stabilizer Prep: Ironing the stabilizer to the fabric before hooping can improve adhesion and reduce residue after removal.
Pro Tips:
- Always test your stabilizer removal technique on a scrap cap or inconspicuous area first.
- For intricate designs with lots of detail, take your time—patience pays off in a clean, professional finish.
By mastering these stabilizer removal techniques, you’ll preserve both your embroidery and your cap’s structure, ensuring your finished piece is ready to wear or sell.
5. Design Placement and Customization
Designing for caps is like composing a miniature masterpiece—limited space, bold seams, and a curved canvas demand both creativity and precision. Whether you’re centering a monogram or adapting a floral motif, the right placement and stitch strategy can make your design pop.
5.1 Centering Patterns and Monograms
Centering your design is crucial for a polished look, especially when working with logos or monograms. Here’s how to nail perfect placement every time:
- Mark the Center: Use a hoop template or mark the center dots on your stabilizer. Draw a line down the center to match the cap’s seam—this seam is your best friend for alignment.
- Laser or Camera Alignment: If your machine offers laser or camera alignment, use it to precisely position your design. The Brother PE800, for example, lets you adjust size, placement, and rotation directly on the touchscreen.
- Template and Trial: Print your design on paper and use it as a template to visualize placement. Mark three-quarters of an inch above the brim along the center seam for classic logo positioning.
- Secure the Cap: Use painter’s tape or pins to hold the inside flap along the brim, flattening the area for hooping. Press the cap flat with your fingers—avoid stretching—to ensure an even surface.
- Trace Before Stitching: Always trace your design outline with the machine to confirm placement and avoid surprises.
Monogramming Tips:
- 3D Puff Embroidery: For bold, raised lettering, use tack-down stitches to secure foam and create a dimensional effect.
- Satin Stitch Dominance: Satin stitches are ideal for monograms, offering smooth, continuous lines that stand out on curved surfaces.
- Font Simplification: Stick to block fonts or geometric shapes—avoid intricate serifs or fine details that can get lost in the limited space (typically under 2.25" in height).
Placement Considerations:
- For front placements, align the center seam with your hoop’s gauge. For back or side placements, use a small round hoop and align with the 12/6 o’clock marks.
By combining precise marking, smart digitizing, and careful hooping, your monograms and logos will look sharp and professional—no matter the cap style.
5.2 Adapting Floral/Geometric Designs
Floral and geometric patterns bring caps to life, but adapting them to a small, curved surface requires thoughtful editing and stitch selection.
Simplification Strategies:
- Artwork Reduction: Limit design height to 2.25" or less, and scale width proportionally. Remove fine lines, shading, and unnecessary details to keep the design crisp.
- Stitch Type Optimization: Use satin stitches for smooth curves (think petals and leaves), and run stitches for outlines or geometric borders.
- Seam Avoidance: Place intricate details away from the center seam to prevent distortion. Pre-curve the cap to its natural shape before hooping for best results.
Common Challenges & Solutions:
| Issue | Solution |
|---|---|
| Needle Deflection | Use sharper needles; tighten hooping |
| Thread Breaks | Lower speed; adjust driver height |
| Design Distortion | Double stabilizer layers or use cut-away |
Advanced Customization Tips:
- Dual-Side Embroidery: Use specialized devices to adjust stitch density for front/back registration.
- Adhesive Spray: Bond fabric to stabilizer for rigid caps, enhancing stability during stitching.
- Testing Protocols: Always run a test on a scrap cap to validate stitch density and tension settings before full production.
By mastering these adaptation techniques, you’ll unlock endless possibilities for creative, eye-catching cap embroidery—even on the trickiest surfaces.
Tip: Look for free embroidery patterns for embroidery machine online to expand your design library.
6. Hand vs. Machine Embroidery Comparison
Choosing between hand and machine embroidery for caps isn’t just about tradition versus technology—it’s about matching your method to your vision, budget, and production needs. Let’s break down the pros, cons, and best-use scenarios for each approach.
6.1 Equipment and Efficiency Analysis
Hand Embroidery:
- Equipment Needed: Embroidery needle, 3–4" hoop, embroidery floss, water-soluble stabilizer (like Sulky Fabri-Solvy), and a steady hand.
- Efficiency: Perfect for custom, one-off pieces or artistic projects. However, each cap can take several hours to complete, especially for detailed designs.
- Skill Level: Accessible for beginners—just a bit of patience and practice required. Great for portable, on-the-go crafting.
- Cost: Low initial investment; ideal for hobbyists or those testing the waters.
Machine Embroidery:
-
Single-Needle Home Machines:
- Equipment: Flatbed machine, 4x4 hoop or specialized cap frame, stabilizer, and embroidery thread.
- Efficiency: Slower for cap embroidery due to manual thread changes and limited embroidery area. Suitable for producing 5–10 caps per hour, depending on design complexity.
- Skill Level: Beginner-friendly for basic designs, but mastering cap hooping and tension adjustments takes practice.
- Cost: Moderate investment; good for small-scale or occasional production.
-
Industrial multi needle embroidery machines:
- Equipment: Tubular arm machine with 6–18 needles, specialized cap frames, and advanced embroidery software. This setup defines a professional-grade multi needle embroidery machine.
- Efficiency: Designed for speed and volume—can produce 30–60+ caps per hour with automatic color changes and minimal intervention.
- Skill Level: Requires greater technical expertise for setup, digitizing, and maintenance.
- Cost: High initial investment, but essential for commercial-scale production.
| Factor | Hand Embroidery | Single-Needle Machine | Multi-Needle Industrial |
|---|---|---|---|
| Initial Investment | Low | Moderate | High |
| Production Capacity | 1 cap/hour | 5–10 caps/hour | 30–60+ caps/hour |
| Skill Level | Beginner | Beginner–Intermediate | Advanced |
| Best For | Art, custom | Small runs, hobby | Bulk, business |
6.2 When to Choose Each Method
Hand Embroidery:
Choose hand embroidery when your project calls for artistry, texture, or a truly personal touch. It’s perfect for custom gifts, limited-edition pieces, or when you want to experiment with unique stitches and materials. The slower pace is a bonus for those who savor the meditative side of crafting.
Machine Embroidery:
Opt for machine embroidery—especially with multi-needle setups—when efficiency, consistency, and scalability are top priorities. If you’re running a business, fulfilling bulk orders, or need to replicate complex, multi-color designs, industrial machines are the clear winner.
Hybrid Approach:
Some embroiderers blend both methods: using machines for the main design and adding hand-stitched accents for a bespoke finish.
Bottom Line:
There’s no “one-size-fits-all” answer. Your choice depends on your creative goals, production volume, and available resources. Whether you’re stitching a single cap for a friend or launching a commercial cap embroidery venture, understanding the strengths of each method will help you deliver results that wow.
Ready to tackle your next cap embroidery project? With these technical solutions, design strategies, and method comparisons in your toolkit, you’re set to create caps that turn heads—one stitch at a time.
7. Advanced Techniques and Solutions
Cap embroidery doesn’t stop at the basics—when you’re ready to tackle thick trucker hats or want to add eye-catching designs to the side or back of a cap, you’ll need a few advanced tricks up your sleeve. Let’s dive into the nitty-gritty of embroidering tough materials and mastering multi-position embroidery, so you can take on any cap project with confidence.
7.1 Embroidering Thick Trucker Hats
If you’ve ever tried to embroider a stiff trucker hat or a cap with a laminated back, you know the struggle is real. These hats fight back with every stitch, but with the right adjustments, you can achieve flawless results.
Needle Selection and Machine Adjustments
- Needle Type: For thick, structured caps, opt for 80/12 titanium needles. These are tough enough to pierce through buckram and laminated layers without bending or breaking. If you’re working with unstructured caps, standard 75/11 needles may suffice, but titanium is always a safe bet for durability.
- Speed Reduction: Slow and steady wins the race—operate your machine at reduced speeds (typically 500–700 stitches per minute) to minimize needle stress and prevent breaks on dense materials.
- Presser Foot Height: Adjust the presser foot height upward (3–4+ clicks up) to accommodate the extra thickness. Lower the needle to an empty panel area (avoiding seams) to measure the height accurately, then gently press down to account for any bounce from the buckram.
- Active Feed Settings: Increase the active feed setting (10–12 for thick caps) to ensure the machine feeds fabric smoothly and maintains even tension.
Hooping Techniques for Structural Stability
- Structured Caps: Often, the buckram acts as its own stabilizer, so you may need minimal extra support. Use a cap frame with a back clip for large designs, but remove the clip if it causes distortion.
- Unstructured or Trucker Hats: Always use a tear-away cap backing as stabilizer, and secure it tightly in the cap frame to prevent shifting. For mesh-backed trucker hats, a small round hoop (like 12cm) works well for back embroidery.
- Alignment: Mark the center of your cap with a washable marker or chalk, and align it carefully with the hoop’s center line. Digitize a placement line along the brim edge to guide your design.
Design Optimization and Troubleshooting
- Digitization: Always start your design at the cap’s center and adjust for curvature. Rotate designs 180° in your embroidery software if needed to match the cap’s orientation.
- Thread Tension: Loosen thread tension slightly to accommodate the cap’s rigidity and prevent puckering.
- Test Runs: Run a test stitch on scrap or a similar cap to ensure your design is optimized for thick, curved surfaces.
Common Issues and Solutions
- Needle Breaks: Switch to 80/12 titanium needles, double-check presser foot height, and slow down your machine.
- Misalignment: Use masking tape to test presser foot movement and align your machine’s needle with the cap seam before starting.
- Distortion: For unstructured caps, use a 3D puff stabilizer and secure the backing during hooping. Always trace your design after hooping to confirm placement.
By dialing in these advanced settings, even the most stubborn trucker hats will yield to your embroidery prowess.
7.2 Multi-Position Embroidery (Side/Back)
Why stop at the front? With the right tools and techniques, you can embroider on the sides and back of caps—no disassembly required. Multi-position embroidery lets you add logos, names, or graphics all around the crown for maximum impact.
Specialized Hoops and Drivers
- commercial embroidery machine for sale like the Janome MB7 or Melco EMT16 offer dedicated hat hoops (such as the Janome HATHOOPMB4 or Melco Wide Angle Cap Frame) that secure the cap while allowing you to rotate it for side or back embroidery.
- Multi-position hoops let you reposition the cap for sequential stitching—front, left side, right side, and back—using alignment marks or registration points.
Alignment and Stabilization
Use built-in laser or camera alignment systems (available on some Brother, Baby Lock, or Melco models) to precisely position your design.
For structured caps, built-in tensioners help keep the fabric taut. For unstructured caps, add stabilizers (like spray adhesive or painter’s tape) to prevent puckering.
Design Preparation and Workflow
- Sectional Stitching: Divide your design into segments for each area (front, side, back) and rotate them 180° as needed in your embroidery software.
- Stabilizer Selection: Use tear-away backing for structured caps and cut-away backing for unstructured or stretchy fabrics.
Step-by-Step Workflow:
- Hoop Preparation: Secure the cap in a multi-position hoop, aligning the bill under the front clamp. Use a tensioner for stability.
- Design Setup: Split the design into sections and rotate as needed.
- Alignment: Use camera or laser tools to center each section. Trace placement marks to verify fit.
- Stitching: Embroider each section in sequence, repositioning the hoop as you go.
- Finishing: Trim excess backing and use a steam iron to remove any hoop marks.
Tips for Success:
- For 270° designs on structured caps, minimal stabilizer is needed thanks to the cap’s built-in tension.
- For unstructured caps, extra stabilizer is essential to keep the fabric taut.
- Always test your stabilizer and stitch density on scrap fabric before committing to your final cap.
By mastering these multi-position techniques, you’ll unlock a whole new world of creative possibilities—no cap disassembly required.
8. Conclusion: Mastering Cap Embroidery
Cap embroidery is a journey of creativity and technical finesse—one that rewards patience, experimentation, and a willingness to tackle new challenges. Whether you’re conquering thick trucker hats with specialized needles and machine tweaks or adding custom flair to every side of a cap, the right techniques make all the difference.
Remember, every cap is a new canvas. Don’t hesitate to experiment with both hand and machine methods to find what best suits your project goals. With the strategies you’ve learned here, you’re well-equipped to turn ordinary hats into wearable works of art. Now, go forth and stitch boldly!
9. FAQ
9.1 Q: How should I wash and care for embroidered caps?
A: Hand-wash embroidered caps gently using mild detergent and cold water. Avoid wringing or twisting the cap, as this can distort both the embroidery and the cap’s shape. Let the cap air dry—placing a rolled towel inside helps maintain its form. To prevent thread degradation, keep caps out of direct sunlight for prolonged periods and store them in a cool, dry place.
9.2 Q: What should I do if my embroidery puckers or the design is misaligned?
A: Puckering or distortion often results from incorrect stabilizer use, improper tension, or hooping issues. To fix puckering, try pressing the area with a steam iron (using a pressing cloth) or carefully re-hoop and restitch the design if possible. For misaligned designs, remove the faulty stitches with a seam ripper and realign your cap before re-embroidering. Always test your setup on scrap fabric first to avoid repeat issues.