
1. Introduction to Adhesive Iron-On Patches
Adhesive iron-on patches have revolutionized the world of garment customization, offering a fast, versatile, and creative way to personalize clothing and accessories. Whether you’re a seasoned embroiderer or a DIY enthusiast, these patches open up endless possibilities—from revamping old jackets to adding flair to hats, bags, and more. In this guide, you’ll discover step-by-step application techniques, tips for choosing the right adhesive, strategies for achieving long-lasting and washable bonds, and advanced ideas for creative projects. We’ll also touch on important safety considerations, ensuring your patchwork is as safe as it is stylish. Ready to master the art of adhesive iron-on patches? Let’s dive in.
Table of Contents
- 1. Introduction to Adhesive Iron-On Patches
- 2. Step-by-Step Application Guide
- 3. Choosing the Right Adhesive
- 4. Achieving Permanent Washable Bonds
- 5. Attachment Method Comparison
- 6. Removal and Troubleshooting Guide
- 7. Advanced Creative Applications
- 8. Conclusion: Mastering Patch Application
- 9. FAQ: Adhesive Iron-On Patches
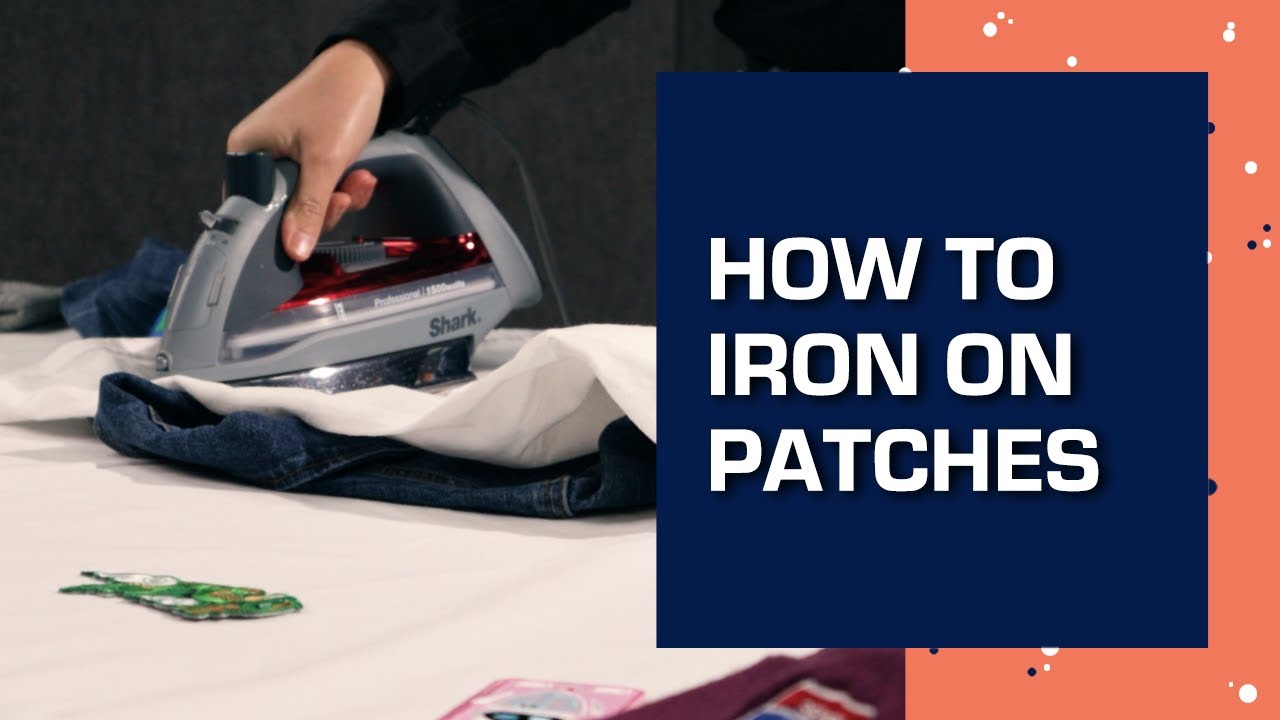
2. Step-by-Step Application Guide
Applying adhesive iron-on patches is both an art and a science. With the right materials and techniques, you can achieve a professional, durable finish that stands up to daily wear and washing. Let’s break down the process into manageable steps:
2.1 Essential Materials and Fabric Preparation
Before you start, gather these essentials:
- Iron (set to the highest heat, typically 370–400°F/188–204°C)
- Press cloth (cotton pillowcase, towel, or bandana)
- Ironing board or any heat-resistant surface
- Adhesive iron-on patch (with heat-activated backing) compatible with your embroidery machine
- Garment (prewashed, dry, and free of lint)
Fabric Compatibility: Iron-on patches work best with cotton and polyester blends. Avoid using them on nylon, rayon, leather, vinyl, satin, wool, or hessian, as these materials may not withstand high heat or may not bond well.
Preparation Steps:
- Prewash and dry your garment to remove any sizing agents that could interfere with adhesion.
- Lay the garment flat on your ironing board, smoothing out all wrinkles for a flawless finish.
Pro Tip: Surface prep is everything! A clean, lint-free, and prewashed fabric ensures the adhesive forms a strong bond, minimizing the risk of peeling later.
2.2 Positioning and Heat Activation Techniques
Now for the fun part—placing and bonding your patch:
- Position the patch adhesive-side down on your chosen spot, making sure the design faces up. Use thermal tape or pins to keep it perfectly in place.
- Preheat your iron to the highest setting (no steam).
- Cover the patch with your press cloth to protect both the patch and the fabric from direct heat.
- Apply firm, even pressure with the iron for 30–60 seconds without moving it. This step is crucial—think of it as sealing your design into the fabric.
- Flip the garment and repeat the process on the reverse side for another 30–60 seconds.
Special Techniques:
- For embroidered or cotton patches, use a Teflon sheet for even heat distribution, especially with a heat press.
- For rhinestone or gem patches, always press from the reverse side to avoid damaging embellishments.
Curiosity Gap: Ever wondered why some patches peel off after one wash? It’s often due to skipping the press cloth or not applying enough pressure and heat. Don’t cut corners—your future self (and your patch) will thank you!
2.3 Cooling and Initial Bond Testing
Patience pays off here:
- Let the patch cool for 1–2 minutes after pressing. This cooling period allows the adhesive to set, locking the patch in place.
- Test the bond by gently tugging at the patch’s edges. If any part lifts, simply repress with your press cloth for another round.
-
Post-application care:
- Avoid washing the garment for 24–48 hours to allow the adhesive to fully cure.
- When it’s time to wash, opt for gentle cycles or hand washing to maximize patch longevity.
Sensory Description: There’s a quiet satisfaction in feeling the patch cool and settle into the fabric—a tactile reminder that your creativity is now part of your wardrobe.
3. Choosing the Right Adhesive
Selecting the right adhesive is the secret sauce to a patch that lasts. Not all adhesives are created equal—let’s explore your options:
3.1 Fabric-Specific Adhesive Solutions
**Heat-Activated Adhesives:** Perfect for natural fibers and heat-resistant synthetics like cotton and denim. They offer quick, permanent bonds but require fabrics that can withstand high temperatures. For polyester, use lower heat and always test first.
**Fabric Glues:** For materials that can’t handle heat (like leather or delicate synthetics), fabric glues such as Gorilla Fabric Glue, E6000, Aleene’s Fabric Fusion, or Beacon Fabri-Tac are excellent choices.
| Adhesive | Best For | Drying Time | Wash Resistance | Key Features |
|---|---|---|---|---|
| Aleene’s Fabric Fusion | Embroidered patches, delicate | 2–4 hours | Moderate | Non-toxic, flexible, acid-free |
| Gorilla Fabric Glue | Denim, leather | 24 hours | High | Permanent, machine-washable |
| Beacon Fabri-Tac | Thick fabrics, backpacks | 24 hours | High | Waterproof, outdoor use |
| E6000 | Industrial, tough fabrics | 24–72 hours | Excellent | Waterproof, dryer-safe |
| Tear Mender | Quick repairs, UV resistance | 15 minutes | High | Fast-drying, UV-resistant |
*Analogy:* Choosing the right adhesive is like picking the right tool for a job—use a hammer for nails, not for screws!
3.2 Durability Factors and Product Selection
**Wash Resistance:**
- E6000 and Gorilla Fabric Glue are champions for repeated washing and heavy use.
- Aleene’s Fabric Fusion is best for hand-washed or gently cycled items.
**Patch Attach Glue** (as found in top search results):
- Bonds almost any patch to almost any fabric without sewing.
- Permanent, washable, non-toxic, and uniquely dry-cleanable.
- Ideal for school emblems, varsity letters, and uniforms.
**Sustainability Considerations:**
- Opt for non-toxic, acid-free adhesives for children’s clothing or eco-conscious projects.
- Always test on scrap fabric first to avoid surprises.
**Best Practices:**
- Prep fabric by ensuring it’s clean and dry.
- Combine methods (such as sewing edges) for high-stress areas.
- Test heat or glue on a small sample before committing.
*Comparison:* Heat-activated adhesives deliver speed and permanence on sturdy fabrics, while fabric glues offer flexibility and compatibility for trickier materials. The right choice depends on your fabric, patch type, and how much wear and tear you expect.
Ready to transform your wardrobe, gear, or accessories? With the right preparation, application, and adhesive, your patches will not only look amazing—they’ll stay put, wash after wash. Let your creativity shine!
4. Achieving Permanent Washable Bonds
Creating a bond that stands up to daily wear and repeated washing is the holy grail of iron-on patch application. If you’ve ever watched your favorite patch slowly peel away after a few spins in the washing machine, you know the frustration. Let’s break down the science—and the art—of making your patches last.
4.1 Critical Application Factors for Longevity
Durability isn’t just luck; it’s the result of nailing a few key steps. Here’s what matters most:
1. Temperature Precision
Set your iron or heat press to the sweet spot—typically between 370–400°F (188–204°C). Too low, and the adhesive won’t activate fully; too high, and you risk scorching the patch or fabric. Always use a pressing cloth to protect both.
2. Pressure Consistency
Firm, even pressure is non-negotiable. Whether you’re using an iron or a heat press, press down steadily for 15–30 seconds per side (or up to 60 seconds for thicker patches). Don’t slide the iron—just hold it in place.
3. Curing Requirements
Patience pays off. Let the adhesive cure for at least 24 hours before washing. This curing window allows the bond to reach its maximum strength, making it far more likely to survive 20–30 wash cycles without peeling.
4. Fabric Compatibility
Denim, cotton, and canvas are your best friends for iron-on patches. Stretchy or synthetic fabrics? They’re notorious for weak bonds and may need extra reinforcement.
5. Post-Application Care
Avoid high heat when washing and drying. Stick to cold water and gentle cycles, and air dry whenever possible. Tumble dryers can weaken the adhesive over time.
Pro Tip: Test the adhesive before committing—try the water droplet test to ensure the patch’s backing is ready to bond.
Key Takeaway: When you combine the right temperature, pressure, and curing time, you’re setting yourself up for a patch that can survive 20–30 washes—almost as permanent as a tattoo, but way less commitment.
4.2 Reinforcement Methods and Care Protocols
Even the best-applied patch can benefit from a little backup—especially on high-stress areas or tricky fabrics.
Edge Stitching
Sewing around the patch’s edge is a classic reinforcement method. A simple running or zigzag stitch not only adds a decorative touch but also provides mechanical support, especially for stretchy fabrics that tend to flex and pull.
Fusible Web Supplements
If your patch starts to lift or you’re working with a stubborn fabric, slip a strip of heat-activated fusible web between the patch and garment. Re-iron to reactivate the adhesive and lock everything in place.
Cold-Water Washing Techniques
Treat your patched garments with care:
- Wash inside out in cold water
- Use gentle cycles
- Avoid bleach and harsh detergents
- Air dry for best results
Professional Embroidery Stability with Magnetic Hoops
For those tackling large-scale or professional embroidery projects, fabric stability during hooping is crucial. Magnetic embroidery hoops like MaggieFrame ensure your fabric stays perfectly flat and secure throughout the embroidery process. Their powerful magnetic system adapts to various fabric thicknesses, preventing shifting and reducing the risk of puckering or misalignment—especially important when adding patches to garments destined for heavy use.
Curiosity Gap: Ever wondered why some patches outlast the garment itself? It’s often the combination of a solid adhesive bond and a little extra reinforcement—think of it as giving your patch a seatbelt for the laundry ride.
5. Attachment Method Comparison
With so many ways to attach a patch, how do you choose? Let’s pit adhesive, sewing, heat-seal, and glue methods against each other in a no-nonsense showdown.
5.1 Adhesive vs. Sewing vs. Heat-Seal Analysis
Each attachment method brings its own strengths and quirks. Here’s how they stack up:
| Method | Durability | Application Method | Washability | Best Use Cases |
|---|---|---|---|---|
| Adhesive (Iron-On) | Moderate (20–30 washes) | Heat activation (320–380°F) | Limited | Jackets, hats, occasional wear |
| Sew-On | High | Hand or sewing and embroidery machine combinations | Yes | Uniforms, workwear, high-stress garments |
| Heat-Seal | High | Heat press (professional) | Yes | Uniforms, heavy-duty workwear |
| Fabric Glues | High | Manual application, 24-hr cure | Yes (waterproof) | Outdoor gear, long-term repairs |
Adhesive (Iron-On) Patches
- Pros: Quick, easy, no sewing skills needed. Great for DIY projects and short-term use.
- Cons: May peel with frequent washing or on heat-sensitive fabrics.
Sew-On Patches
- Pros: Maximum durability and universal compatibility.
- Cons: Requires sewing skills and more time.
Heat-Seal Methods
- Pros: Professional finish and waterproofing.
- Cons: Needs specialized equipment and higher upfront cost.
Fabric Glues
- Pros: Strong, flexible, and waterproof bonds.
- Cons: Requires careful application and full curing time.
YouTube Insights: Videos demonstrate that heat transfer is lightning-fast—perfect for bulk projects—while embroidery or sewing, though slower, delivers unmatched longevity. The choice? It’s all about your priorities: speed or staying power.
Key Trends:
- For events or fast fashion, iron-on adhesives win for convenience.
- For uniforms, outdoor gear, or anything that takes a beating, sewing or heat-seal reigns supreme.
- Fabric glues bridge the gap, offering waterproof durability without a needle.
5.2 Hybrid Solutions for Challenging Fabrics
Sometimes, one method just isn’t enough—especially with tricky synthetics or high-stress zones. Enter the hybrid approach.
Glue + Stitching Combos
Apply a thin layer of fabric glue to the patch’s back, press it in place, then reinforce with a running or zigzag stitch around the edge. This tag-team approach is ideal for polyester, nylon, or textured fabrics that resist standard adhesives.
Low-Heat Alternatives
For delicate materials, use low-temperature glue guns or fusible webbing designed for synthetics. Always test on a scrap first to avoid disasters.
Precision Hooping with MaggieFrame
When machine embroidery is part of your patch process—especially for garment applications—fabric movement is the enemy. MaggieFrame magnetic embroidery hoops deliver rock-solid stability, adapting automatically to different fabric thicknesses. This ensures precise, distortion-free stitching, even on challenging textiles. The result? Cleaner designs, fewer mistakes, and patches that stay put through wash after wash.
Analogy: Think of MaggieFrame as the pit crew for your embroidery race car—holding everything steady so you can focus on the finish line.
6. Removal and Troubleshooting Guide
Mistakes happen. Patches peel. Adhesive fails. Don’t panic—here’s how to fix, remove, or reposition patches without ruining your garment (or your day).
6.1 Safe Removal Techniques
Heat-Based Methods
- Place a wax paper or thin cloth over the patch.
- Use an iron on medium-high heat for 15–30 seconds to soften the adhesive.
- Gently lift the patch with tweezers from one corner while warm.
Pro Tip: For delicate fabrics, a hairdryer offers more controlled heat.
Adhesive Remover Solutions
- Use a fabric-safe remover (like Goo-Gone).
- Test on a hidden spot first.
- Apply to the patch’s underside, let it work, and gently peel.
Chemical Solvent Methods
- For stubborn adhesives, use acetone or nail polish remover (test first!).
- Work in a ventilated area with gloves and a mask.
- Dab solvent onto the patch’s edge, lift with a plastic scraper, and wash the garment thoroughly.
| Method | Steps | Best For |
|---|---|---|
| Adhesive Remover | Apply, rub gently, rinse | Most fabrics |
| Acetone | Dab, wipe clean, launder | Synthetic fabrics |
| Rubbing Alcohol | Blot with alcohol-soaked cloth, rinse | Delicate materials |
Repositioning Patches
If you need to move a patch, act fast. If the adhesive is still tacky, reapply with heat. If not, use a new patch for best results.
Key Considerations:
- Always test heat or solvents on a hidden area first.
- Heat is generally safer than solvents for most fabrics.
- Clean residue immediately to avoid permanent stains.
6.2 Solving Common Adhesion Failures
Patches Not Sticking Initially?
- Check your heat and pressure—iron should be at the highest safe setting, no steam.
- Clean the fabric with rubbing alcohol to remove oils or residues.
- For stubborn patches, use a pressing cloth and try again.
Peeling Over Time?
- Reapply heat with a press cloth for 30–40 seconds.
- Secure edges with fabric glue.
- For ultimate security, sew around the patch’s edge.
Adhesive Failure on Specific Fabrics?
- Cotton/Denim: Standard iron-on works well.
- Polyester/Nylon: Use fusible web or adhesive tape for extra grip.
- Faux Leather: Try ironing from both sides.
- Fleece/Ribbed: Flatten fabric and use a pressing cloth.
Testing Protocols:
- Always pre-wash garments to remove finishes.
- Use a flat, wrinkle-free surface and pressing cloth for even heat.
- Let the patch cool completely before handling.
Advanced Reinforcement:
- Double-sided ironing (front and back) for deep adhesion.
- Combine sewing and adhesive for high-stress areas.
- Fusible web is your friend for synthetic or problematic fabrics.
Best Practices Recap:
- Pre-treat, apply with precision, and care for your patched items gently.
- For persistent embroidery machine adhesion issues, consult local embroidery machine repairs near me. A hybrid approach—heat, glue, and stitching—will keep your patches secure and looking sharp.
Ready to patch like a pro? With these techniques, your creativity—and your patches—will stand the test of time, wash after wash.
7. Advanced Creative Applications
Adhesive iron-on patches are not just for denim jackets or backpacks anymore. The world of DIY is exploding with ways to use these patches on everything from home décor to accessories—and even on surfaces you never thought possible. Ready to break the rules and take your creativity to new heights? Let’s dive into advanced applications that will have you seeing patches in a whole new light.
7.1 Non-Textile Surfaces and Mixed Materials
Who says patches are only for fabric? With the right adhesive, you can transform wood, metal, and plastic into canvases for your patch art. Here’s how to make your mark beyond the wardrobe:
Wood
Want to jazz up a wooden jewelry box or picture frame? Use a strong craft adhesive like E6000 to attach patches. Clean the wood thoroughly, apply a thin layer of glue to the patch back, press in place, and let it cure for 24 hours. This method is ideal for upcycled décor and personalized gifts.
Metal
Metal surfaces—think lockers, toolboxes, or even lampshades—can be patch-friendly too. Flexible adhesives like E6000 create a durable, waterproof bond. For extra flair, glue magnets to the back of your patch for easy, non-permanent display on any metal surface.
Plastic
From phone cases to storage bins, plastic surfaces open up a world of patch possibilities. Use a glue gun on a low-temperature setting (around 260°F) to avoid warping the plastic. Apply the glue to the patch, press it onto the surface, and hold until set. Always test on a small area first to ensure compatibility.
Mixed-Material Projects
Combining textiles with hard surfaces? Flexible fabric glues like E6000 Fabri-Fuse excel at bonding patches to shoes, pet collars, or canvas accessories that endure frequent flexing and moisture.
DIY Market Growth
The embroidered badges and patches market is booming, projected to grow from $100.2 million in 2023 to $272.38 million by 2030—driven in large part by the surge in DIY and craft applications. Iron-on patches are leading the charge, especially as makers discover their versatility for fashion, décor, and beyond.
Best Practices
- Always clean and dry the surface before applying adhesive.
- Use low heat or specialized adhesives for sensitive materials like leather.
- Reinforce high-stress items (like backpacks or shoes) with a combination of glue and stitching for maximum durability.
Curiosity gap: Ever thought about patching your skateboard, lamp, or even a flowerpot? With the right adhesive, your only limit is your imagination.
7.2 Home Decor and Accessory Projects
Why stop at clothing? Adhesive iron-on patches are a gateway to endless home and accessory transformations. Here’s how to bring your patchwork dreams to life, room by room:
Patch Pillows and Blankets
Turn plain pillows or throws into memory quilts or statement pieces by sewing or gluing patches onto the fabric. For extra wash resistance, opt for sewing around the edges after gluing, especially on high-use items like blankets.
Pet Accessories
Personalize your pet’s collar or harness with a patch using flexible glue. E6000 is a favorite for its waterproof durability—perfect for pups who love to get messy.
Upcycled Furniture
Give old furniture a new lease on life by attaching patches to fabric lampshades or upholstered chairs. Use Heat N Bond or similar fusible adhesives for fabric surfaces; for wood or metal, stick with strong craft glues. For lampshades, try reflective-thread patches for a subtle glow when the lamp is on.
Display Boards and Systems
Create a rotating gallery of your favorite patches with corkboards and decorative pins, or wrap foam boards with fabric for a customizable backdrop. For metal displays, glue magnets to your patches for easy swapping.
Step-by-Step: Turning Embroidery Into an Adhesive Patch
- Trim your finished embroidery to the desired patch size using embroidery design software for custom patterns.
- Trace and cut Heat N Bond to match your patch.
- Iron Heat N Bond to the back of your embroidery using medium heat.
- Peel off the backing, place the patch on your chosen fabric or surface, and iron again to secure.
- For a polished look, whipstitch the edges to prevent fraying.
- Add another layer of Heat N Bond to the back if you want to make the patch ready for future use.
Transformation tip: Even a tired old chair or a thrifted tote bag can become a conversation starter with a few well-placed patches.
Creative Applications Beyond Clothing
- Jewelry: Turn small patches into necklaces or charms by sewing on metallic threads.
- Footwear: Attach patches to shoe tongues or side panels with flexible glue for a custom look that stands up to wear.
- Furniture: Decorate boxes, organizers, or even lamp bases with patches for a playful, personalized vibe.
Market Trends
With the rise of personalized décor and the DIY movement, patches are fast becoming a staple for crafters and home designers alike. The only question left: What will you patch next?
8. Conclusion: Mastering Patch Application
Mastering adhesive iron-on patches is all about combining the right techniques with a spirit of creative adventure. From perfecting your heat application and choosing the best adhesive for each surface, to troubleshooting and exploring new project ideas, you’re now equipped to make your mark—literally—on just about anything. Whether you’re revamping a wardrobe, personalizing home décor, or experimenting with non-traditional surfaces, remember: the best results come from careful prep, patience, and a willingness to try something new. So go ahead—patch boldly, patch often, and let your creativity shine.
9. FAQ: Adhesive Iron-On Patches
9.1 Q: How can I reactivate a loose iron-on patch?
A: If your patch starts to lift, place a press cloth over it and reapply heat with an iron for 10–15 seconds. For extra security, apply a small amount of fabric glue to the edges before pressing again.
9.2 Q: What’s the best washing temperature for patched items?
A: Wash patched garments in cold water on a gentle cycle. Turn items inside out to protect the patch, and air dry whenever possible to prolong adhesion.
9.3 Q: Are there fabric limitations for adhesive iron-on patches?
A: Yes. Iron-on patches work best on cotton and polyester blends. Avoid using them on nylon, rayon, leather, vinyl, satin, wool, or hessian, as these materials may not bond well or could be damaged by heat.
9.4 Q: Can I reposition a patch after it’s been applied?
A: Repositioning is easiest while the adhesive is still tacky. If the patch has set, gently lift it using heat (iron or hairdryer) or a fabric-safe adhesive remover. Clean any residue before reapplying.
9.5 Q: What if my patch starts to peel after washing?
A: Reapply heat with a press cloth, or use fabric glue to secure loose edges. For high-wear areas, stitching around the patch can reinforce the bond.
9.6 Q: Can I use fabric glue instead of ironing on a patch?
A: Yes. Fabric glue is a great alternative, especially for delicate or heat-sensitive fabrics. Apply a thin, even layer to the patch back, press in place, and let it cure for 24 hours.
9.7 Q: Will adhesive damage my clothing or accessories?
A: High-quality fabric adhesives are designed not to damage fabric, but always test on a hidden area first and follow manufacturer instructions.
Patch on, and let your creativity lead the way!
